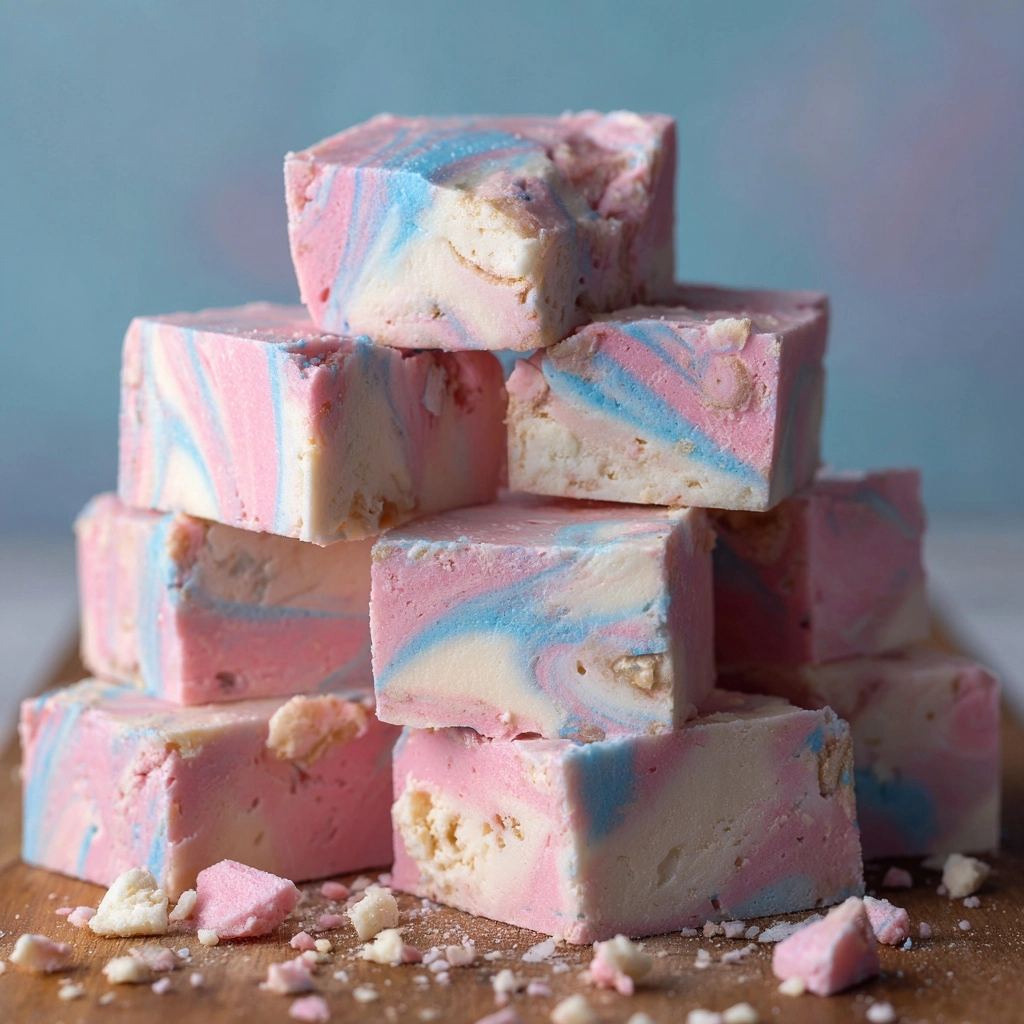
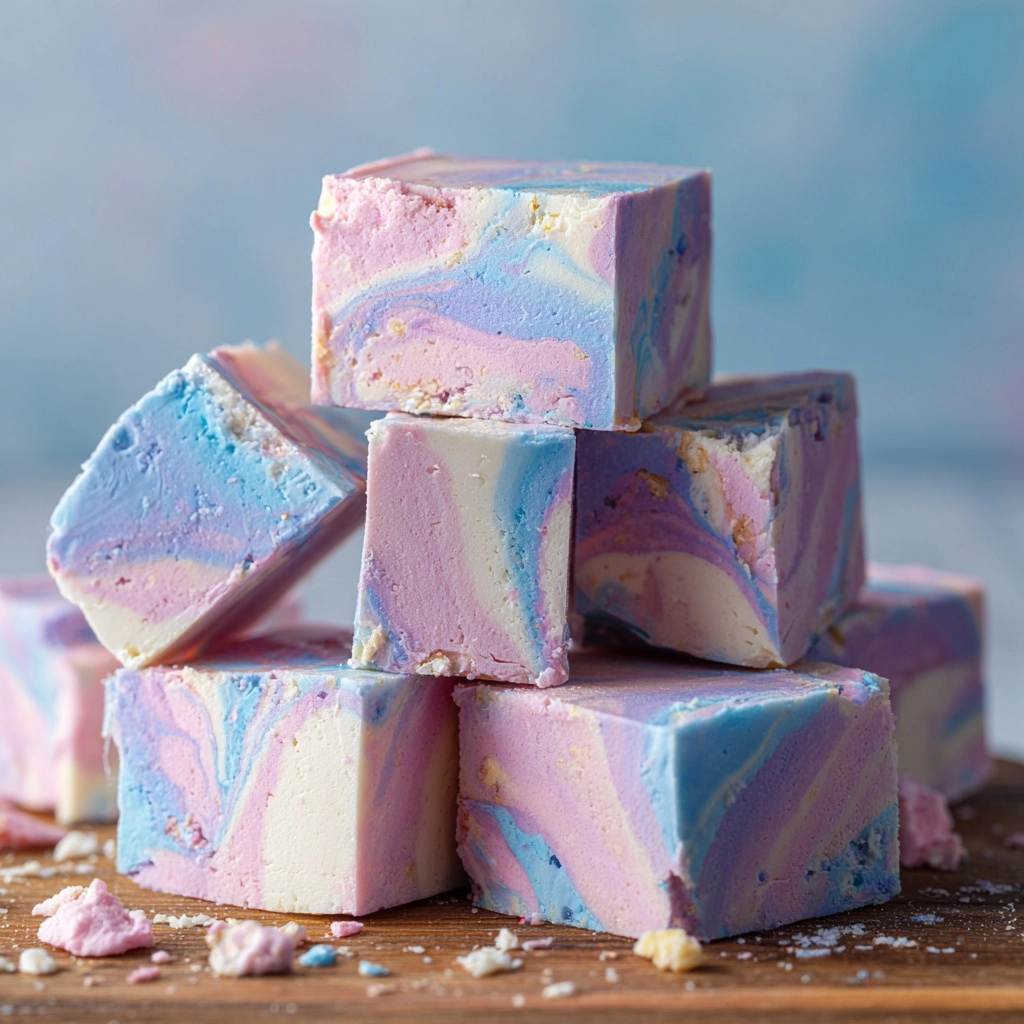
There’s nothing quite like the magical nostalgia of a carnival treat, and this Cotton Candy Fudge captures every bit of that fun in candy form! Each square is a dreamy swirl of pastel pink and blue, bursting with the signature spun sweetness of cotton candy. With its irresistibly creamy texture and easy no-bake method, this delightful fudge is every bit as enchanting to look at as it is to eat. Perfect for birthdays, parties, or a simple afternoon treat, this is a recipe that’s sure to spark joy for kids and grown-ups alike.
Ingredients You’ll Need
Ingredients You’ll Need
The most beautiful thing about making Cotton Candy Fudge is how a handful of simple ingredients transform into something truly magical. Each one matters, from the melty white chocolate chips down to the finishing touch of rainbow sprinkles. Here’s what you’ll need — and why it matters!
- White chocolate chips: These provide the silky, creamy base and help the fudge set up perfectly without the need for a candy thermometer.
- Sweetened condensed milk: Brings the right amount of sweetness and gives the fudge an ultra-smooth, slightly chewy texture.
- Cotton candy flavoring: The secret ingredient that infuses every bite with that unmistakable carnival flavor — start with a teaspoon and adjust to your taste.
- Pink and blue gel food coloring: Turns your fudge into a swirly, magical masterpiece without thinning or changing the texture.
- Sprinkles or edible glitter (optional): These make your fudge sparkle and add a playful, colorful finish — perfect for parties or just a bit of extra fun.
How to Make Cotton Candy Fudge
Step 1: Prep Your Pan and Ingredients
Line an 8×8-inch baking pan with parchment paper, leaving a little extra on the sides to act as handles later. This simple trick makes removing and cutting the Cotton Candy Fudge a total breeze. Gather all your ingredients and measure them out before you start — this makes the whole process even more enjoyable and mess-free!
Step 2: Melt the White Chocolate and Condensed Milk
In a medium saucepan set over low heat, combine the white chocolate chips and sweetened condensed milk. Stir gently but constantly with a spatula or wooden spoon — you want the chocolate completely melted and the mixture perfectly smooth. Be patient and keep the heat low to avoid scorching the chocolate or getting any graininess.
Step 3: Add the Cotton Candy Flavoring
Once your mixture is glossy and lump-free, take it off the heat. Stir in the cotton candy flavoring, starting with a teaspoon. Taste and add a tad more if you want a stronger hit of that classic, sugary flavor. Just be careful — a little goes a long way!
Step 4: Tint and Swirl
Divide the fudge mixture evenly into two bowls. Into one bowl, add a drop or two of pink gel food coloring; into the other, a bit of blue. Mix each with a clean spoon or spatula until fully blended and brilliantly colored. Now, drop spoonfuls of the pink and blue fudge into your prepared pan, alternating as you go. Swirl gently with a knife or skewer to create a gorgeous marbled effect — don’t overmix, or you’ll lose that hypnotic look.
Step 5: Add the Finishing Touches and Chill
If you’re going all out, sprinkle the top of the fudge with rainbow sprinkles or edible glitter for a truly show-stopping finish. Once decorated, pop the tray into the fridge for at least 2 hours, or until the fudge is firm and set. Finally, using your parchment handles, lift the slab out and cut it into squares. Voila — your Cotton Candy Fudge is ready to steal the show!
How to Serve Cotton Candy Fudge
Garnishes
When it comes to dressing up Cotton Candy Fudge, a little goes a long way! Classic rainbow sprinkles add a playful, festive vibe, while edible glitter gives your fudge a shimmery, mystical look. For a super-special touch, try topping each square with a tiny tuft of actual cotton candy just before serving (keep in mind it’ll melt quickly on contact with moisture, so add right before eating).
Side Dishes
Pair your fudge with bowls of fresh fruit — strawberries and blueberries are lovely for a color match — or set it on a platter with mini cookies and popcorn for a whimsical dessert board. It also shines alongside a vanilla milkshake or pastel-hued lemonade for an all-in celebration of vibrant flavors.
Creative Ways to Present
Take your presentation to the next level by stacking fudge squares in clear jars or treat bags tied with a ribbon — they make the cutest party favors! For a birthday, arrange the colorful squares in a spiral on a platter, or serve as part of a pastel dessert buffet. You can even skewer them with marshmallows for a playful dessert kebab!
Make Ahead and Storage
Storing Leftovers
Cotton Candy Fudge keeps beautifully in an airtight container in the fridge for up to one week. Layer squares between sheets of parchment to prevent sticking. The flavors stay true and the texture remains creamy and dreamy, making it easy to enjoy a little piece of carnival whenever you like.
Freezing
If you’re making a batch ahead of time, this fudge is surprisingly freezer-friendly! Wrap individual squares in plastic wrap and place them in a zip-top freezer bag. Store for up to two months, thawing in the refrigerator whenever the craving strikes. Avoid freezing with toppings like cotton candy, as they can get sticky after thawing.
Reheating
Cotton Candy Fudge doesn’t actually need traditional reheating, but if you’d like to serve it at just the right soft, creamy texture, let the squares sit at room temperature for 10 to 15 minutes after removing from the fridge. They’ll be slightly cool, easy to bite, and fully melt-in-your-mouth!
FAQs
Can I use a different type Dessert
White chocolate works best for this recipe because its neutral flavor lets the cotton candy flavoring truly shine and gives the prettiest pastel colors. Using milk or dark chocolate would overpower the delicate taste and alter the look of your Cotton Candy Fudge.
Where can I find cotton candy flavoring?
Cotton candy flavoring is often sold at craft stores in the baking aisle or online under “flavor oils” or “candy flavoring.” It’s also available at specialty cake supply shops. A tiny bottle lasts forever and is wonderful for all sorts of confections!
Can I use liquid food coloring instead of gel?
Gel food coloring is highly recommended for Cotton Candy Fudge because it creates vivid colors without adding extra liquid, which could make your fudge too soft or grainy. If you only have liquid, use the very smallest amount possible and expect slightly paler hues.
Is this fudge suitable for a gluten-free diet?
Absolutely! All the ingredients in this recipe are gluten-free, but if you’re serving someone with celiac or severe gluten intolerance, always double-check the labels on your flavoring, chocolate chips, and toppings for any hidden gluten sources.
How do I get clean, professional-looking squares?
For perfect pieces, use a very sharp knife and wipe it clean between each cut. Chilling the fudge thoroughly makes slicing neat and easy, and the parchment paper “sling” helps you lift the set fudge out of the pan without breaking or sticking.
Final Thoughts
If you’re dreaming of a treat that brings the sparkle of a fairground right to your kitchen, you simply have to try Cotton Candy Fudge. Whether you’re making it for a party or just to brighten a regular day, its colorful swirls and classic flavor are sure to put a smile on everyone’s face. Don’t wait for the next carnival — create the magic at home and surprise someone special (or yourself!) with this enchanting dessert!
Print
Cotton Candy Fudge Recipe
- Prep Time: 10 minutes
- Cook Time: 5 minutes
- Total Time: 2 hours 15 minutes (including chilling)
- Yield: 25 small squares
- Category: Dessert
- Method: No-Bake
- Cuisine: American
- Diet: Vegetarian, Gluten-Free
Description
Indulge in the whimsical and delightful flavors of cotton candy with this easy-to-make cotton candy fudge recipe. This colorful and sweet treat is perfect for parties, special occasions, or whenever you need a bit of fun and sweetness in your day.
Ingredients
Ingredients:
- 2 ½ cups white chocolate chips
- 1 (14 oz) can sweetened condensed milk
- 1 teaspoon cotton candy flavoring (or to taste)
- Pink and blue gel food coloring
- Sprinkles or edible glitter for decoration (optional)
Instructions
- Prepare the Pan: Line an 8×8-inch baking pan with parchment paper, leaving some overhang for easy removal.
- Melt the Chocolate: In a medium saucepan over low heat, combine the white chocolate chips and sweetened condensed milk. Stir continuously until the chocolate is fully melted and the mixture is smooth.
- Add Flavoring: Remove from heat and stir in the cotton candy flavoring.
- Color the Fudge: Divide the mixture into two bowls. Tint one bowl with pink gel food coloring and the other with blue. Drop spoonfuls of each color alternately into the prepared pan, then swirl gently with a knife or skewer to create a marbled effect.
- Decorate: Top with sprinkles or edible glitter if desired.
- Chill: Refrigerate for at least 2 hours, or until firm.
- Serve: Once set, lift the fudge out of the pan using the parchment and cut into squares.
Notes
- Cotton candy flavoring can be found online or in specialty baking stores.
- Use gel food coloring to keep the texture smooth and vibrant.
- Store in an airtight container in the fridge for up to one week.
Nutrition
- Serving Size: 1 square
- Calories: 140
- Sugar: 16g
- Sodium: 25mg
- Fat: 7g
- Saturated Fat: 5g
- Unsaturated Fat: 2g
- Trans Fat: 0g
- Carbohydrates: 18g
- Fiber: 0g
- Protein: 2g
- Cholesterol: 5mg

