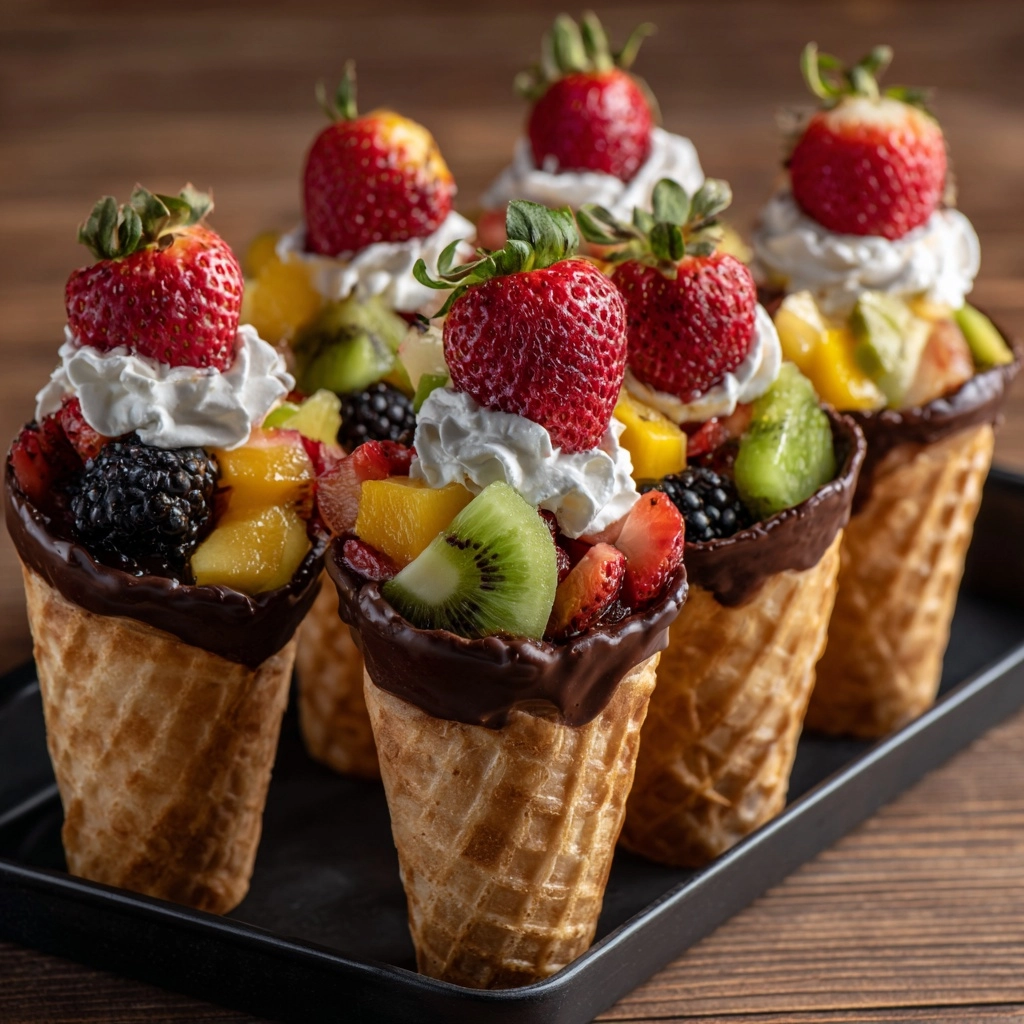
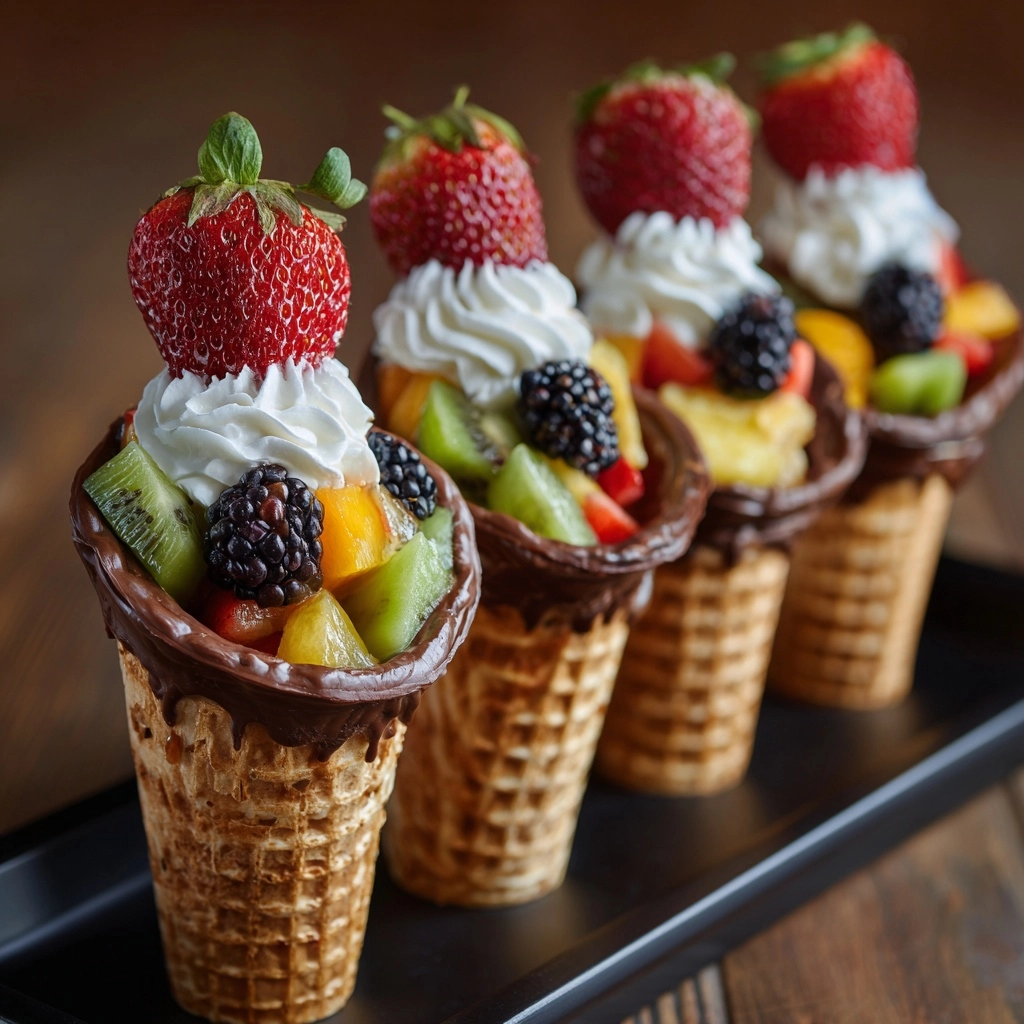
If you’re daydreaming about a summer treat that’s both elegant and downright fun, Chocolate Dipped Fruit Filled Cones are your answer. Picture this: crispy sugar cones, their rims dipped in glossy, rich chocolate, filled to the brim with colorful mixed berries and succulent tropical fruit, finished with a cloud of whipped cream or a dollop of creamy yogurt—and maybe even extra sprinkles or coconut for good measure! These cones are the kind of fuss-free dessert that makes kids squeal with excitement and adults sneak second (or third!) helpings. They’re just as fabulous for a sunny brunch, a backyard bash, or when you need a little joy in your weeknight routine. And the best part? They’re as easy to make as they are to devour.
Ingredients You’ll Need
Chocolate Dipped Fruit Filled Cones come together with a handful of fresh, simple ingredients—each one playing a starring role in both flavor and appearance. The crunchy cones offer that beloved ice cream shop nostalgia, chocolate brings luscious decadence, and the fresh fruit fills every bite with a pop of juiciness and color. Here’s what you’ll need for these party-worthy cones:
- Sugar Cones: Their crisp texture makes the perfect edible vessel and holds up brilliantly to fillings.
- Semi-sweet Chocolate Chips: Melted into a liquid pool for dipping, they create a classic chocolate shell around each cone.
- Coconut Oil: Just a teaspoon added to your chocolate helps it stay silky smooth and glossy (and adds a subtle tropical note).
- Fresh Berries: A vibrant mix of strawberries, blueberries, and raspberries brings sweet-tart flavor and a jewel-toned palette.
- Diced Mango or Kiwi: A fun twist! These add tropical flair and a juicy, refreshing bite to every cone.
- Whipped Cream or Vanilla Yogurt (optional): For an indulgent, creamy base and extra richness (plus, it helps hold the fruit in place).
- Sprinkles, Shredded Coconut, or Chopped Nuts (optional): For playful, customizable toppings—let your imagination (and pantry) guide you!
How to Make Chocolate Dipped Fruit Filled Cones
Step 1: Melt the Chocolate
Start by combining your chocolate chips and coconut oil in a microwave-safe bowl. Microwave in short 20-second bursts, stirring after each session, until the chocolate is completely smooth and shiny. This gentle treatment ensures everything melts evenly and prevents scorching—your chocolate will be silky and ready for dipping in less than a minute!
Step 2: Dip the Sugar Cones
Take each sugar cone and gently dip the top rim into the melted chocolate, swirling to create an even, generous layer. Let any extra chocolate trickle off—no drips wasted! While the chocolate is still wet, dip the edges in your choice of sprinkles, coconut, or chopped nuts for a burst of fun and flavor. Stand the cones upright (a tall cup or glass works perfectly) and let the chocolate set. If you’re eager, pop them in the fridge for about 5 to 10 minutes for speedy hardening.
Step 3: Fill with Cream and Fruit
Once the chocolate coating has firmed up, you’re ready to stuff the cones. Add a spoonful of whipped cream or vanilla yogurt to the base of each cone—this creamy layer not only tastes heavenly but also helps anchor the fruit in place. Then, pile in your chopped berries and tropical fruit until each cone is overflowing with color and juiciness. It’s pure happiness in every nibble!
Step 4: Serve and Enjoy!
The cones are best enjoyed immediately after filling, when their chocolate shell is crisp and the fruit is at its most vibrant. Hand them out at parties or pile them onto a serving tray for your family—either way, watch them disappear fast!
How to Serve Chocolate Dipped Fruit Filled Cones

Garnishes
The magic of Chocolate Dipped Fruit Filled Cones is in their customizable flair. Finish with a shower of rainbow sprinkles for pure joy, a sprinkle of toasted coconut for tropical vibes, or chopped nuts for a sophisticated twist. For special occasions, a drizzle of extra melted chocolate or a dusting of powdered sugar makes these cones absolutely photo-ready.
Side Dishes
While these cones are seriously satisfying on their own, they pair beautifully with a refreshing fruit salad, a platter of shortbread cookies, or a tall glass of iced tea or sparkling lemonade. For a brunch spread, set out some extra yogurt or honey so guests can drizzle or dip as they munch.
Creative Ways to Present
Arrange the finished Chocolate Dipped Fruit Filled Cones upright in a decorative vase or clear drinking glass for a stunning centerpiece everyone can pluck from. For a kids’ party, nestle the cones in a bed of colorful candies or marshmallows to keep them standing tall. If it’s a more elegant affair, wrap each cone in a napkin or parchment to catch drips and add a polished, festive touch.
Make Ahead and Storage
Storing Leftovers
If you somehow have leftover cones (unlikely, but it happens!), store any unfilled, chocolate-dipped cones in an airtight container at room temperature for up to a day. Filled cones are best enjoyed the day they’re made, as the fruit can soften the cone over time.
Freezing
It’s best not to freeze Chocolate Dipped Fruit Filled Cones once they’re filled, as the fresh fruit and cream can get soggy. However, you can absolutely prep the chocolate-dipped cones in advance and freeze them (plain, without fruit) for up to a month. Just let them come to room temperature before filling and serving.
Reheating
There’s no need to reheat these cones! The beauty of this recipe is its no-bake, ready-to-eat thrill. If you refrigerated your chocolate-dipped cones in advance, just allow them a few minutes on the counter so the chocolate regains its silky snap before adding the fruit and cream.
FAQs
Can I use other types of cones besides sugar cones?
Absolutely! While sugar cones give a satisfying crunch and classic shape for Chocolate Dipped Fruit Filled Cones, waffle cones or even cake cones work well. Just ensure they are sturdy enough to hold the chocolate and fruit without getting soggy too quickly.
What other fruits can I use?
Feel free to get creative! Any fruit that holds its shape and doesn’t release too much juice is fair game. Think chopped peaches, seedless grapes, blackberries, pineapple, or even cherries—just be sure they’re pitted and bite-sized.
How do I make this dessert dairy-free?
It’s easy! Simply skip the whipped cream or dairy yogurt and use a plant-based yogurt or coconut whipped cream instead. The rest of the Chocolate Dipped Fruit Filled Cones are naturally dairy-free.
Can I prep these cones ahead for a party?
You sure can! Dip the cones in chocolate and store them (unfilled) in an airtight container for up to a day ahead. Just fill with cream and fruit right before serving to keep everything crisp and delicious.
How can I prevent the cones from becoming soggy?
The key is to fill the Chocolate Dipped Fruit Filled Cones right before serving and to use a small layer of cream or yogurt at the base to act as a barrier. Keeping the fruit well-drained and serving immediately after assembly are pro tips for maximum crunch.
Final Thoughts
If you’re longing to impress your crowd with a treat that’s as pretty as it is tasty, give these Chocolate Dipped Fruit Filled Cones a try. They’re endlessly fun to make and even more delightful to eat—bursting with fresh flavor, creamy sweetness, and a playful sense of celebration. Grab a box of cones and your favorite fruit, and enjoy a dessert that guarantees smiles all around!
Print
Chocolate Dipped Fruit Filled Cones Recipe
- Prep Time: 15 minutes
- Cook Time: 0 minutes
- Total Time: 15 minutes
- Yield: 6 cones
- Category: Dessert, Snack
- Method: No-Cook
- Cuisine: American
- Diet: Vegetarian
Description
These Chocolate Dipped Fruit Filled Cones are a delightful treat perfect for summer days. Fresh fruit nestled in a chocolate-dipped sugar cone makes for a fun and tasty dessert or snack.
Ingredients
Sugar Cones:
- 6 sugar cones
Chocolate Coating:
- 1 cup semi-sweet chocolate chips
- 1 teaspoon coconut oil
Fruit Filling:
- 1 1/2 cups fresh berries (such as strawberries, blueberries, raspberries)
- 1/2 cup diced mango or kiwi
Optional:
- 1/2 cup whipped cream or vanilla yogurt
- Sprinkles, shredded coconut, or chopped nuts for garnish
Instructions
- Melt Chocolate: In a microwave-safe bowl, combine chocolate chips and coconut oil. Microwave in 20-second intervals, stirring until smooth.
- Dip Cones: Dip sugar cone tops into melted chocolate, let excess drip off. Optionally coat rims with garnishes.
- Set Cones: Place cones upright on parchment-lined tray. Allow chocolate to set, refrigerating for quicker setting.
- Fill Cones: Once set, spoon whipped cream or yogurt into cones, then add fresh fruit mix.
- Serve: Enjoy immediately for best taste.
Notes
- You can prepare the cones ahead and store them airtight.
- For dairy-free, omit yogurt or use coconut whipped cream.
Nutrition
- Serving Size: 1 cone
- Calories: 190
- Sugar: 17g
- Sodium: 30mg
- Fat: 9g
- Saturated Fat: 6g
- Unsaturated Fat: 2g
- Trans Fat: 0g
- Carbohydrates: 26g
- Fiber: 2g
- Protein: 2g
- Cholesterol: 5mg


