
The Rain Cloud in a Jar is pure magic in a glass—an irresistibly simple, eye-catching science activity that brings the wonder of weather right into your kitchen or classroom. With just a handful of everyday items you likely already have, this fun experiment lets you (and any eager little helpers) explore the basics of how clouds make rain by turning shaving cream, water, and a bit of food coloring into a mesmerizing miniature storm. Part craft, part science demo, and all delight, it’s a surefire crowd-pleaser for curious minds and creative spirits alike.

Ingredients You’ll Need
-
Ingredients:
- 1 large clear glass jar or cup
- Water (enough to fill the jar 3/4 full)
- Shaving cream (foam type, not gel)
- Food coloring (blue or any desired color)
- Small cup or bowl for mixing
- Dropper or spoon
How to Make Rain Cloud in a Jar
Step 1: Prepare Your Jar
Start by filling your clear jar or cup about three-quarters of the way with water. Take your time and keep it steady; the more calm and clear your water, the more dramatic your Rain Cloud in a Jar will look as the experiment unfolds. This water acts as the “atmosphere” for your rainstorm.
Step 2: Create Your “Cloud”
Next, give the can of shaving cream a good shake, then gently spray a generous layer onto the surface of the water until it forms a fluffy, opaque cloud on top. Be careful not to overdo it—an even, just-thick-enough covering will sit beautifully and hold the “rain” as it builds up.
Step 3: Let the Cloud Settle
Let your shaving cream cloud rest for a minute or two. This helps it even out, so you’ve got a sturdy “sky” to support your upcoming rainfall. Now’s the perfect time to admire your handiwork and get your food coloring ready!
Step 4: Mix the Rain
In a small cup or bowl, combine a few drops of your chosen food coloring with a tiny splash of water. This mixture becomes your future raindrops. If you’re feeling adventurous, try swirling together a couple of colors for a vibrant, tie-dye effect.
Step 5: Make It Rain!
Using a dropper or spoon, slowly add drops of your colored water onto the shaving cream cloud. Pause after a few drops and watch what happens—the “rain” will pool until it finally seeps through, tumbling down into the water below! Repeat and experiment to see how much your cloud can hold before the skies open. The Rain Cloud in a Jar effect never gets old!
How to Serve Rain Cloud in a Jar

Garnishes
While you won’t be eating this dish, a little extra flair goes a long way! Consider setting your Rain Cloud in a Jar on a brightly colored tray or next to a vase of flowers to really make the colors pop. If you’re presenting to a group, try sprinkling glitter or sequins near the jar base for an added “stormy sky” vibe.
Side Dishes
Pair your Rain Cloud in a Jar with printable weather worksheets or simple explanations about the water cycle. If working with kids, add in bite-sized snacks like cloud-shaped marshmallows or blue Jell-O cups for a playful, thematic snack break between science experiments.
Creative Ways to Present
The magic’s in the reveal, so gather friends or kids around before you make it rain! Try using several jars side by side with different food coloring blends, or dim the lights a bit to let the swirling colors glow. For educational flair, combine demonstration with storytelling—let everyone name their “storm” and describe the “weather report” for their Rain Cloud in a Jar.
Make Ahead and Storage
Storing Leftovers
While the Rain Cloud in a Jar is meant for immediate enjoyment, you can leave your jar on display for a few hours—the colorful swirls will continue to shift and settle, creating new patterns. Eventually, though, the shaving cream will break down and separate, so snap those photos while the magic lasts!
Freezing
Freezing isn’t recommended for this experiment—shaving cream and food coloring react unpredictably in the freezer, often turning your creation into something less than spectacular. Instead, enjoy the process in real time and use fresh ingredients for each “stormy” session.
Reheating
Since the Rain Cloud in a Jar relies on cool water and foam, there’s no need to reheat. If you want to experience the experiment again, simply start fresh with a clean jar, cool water, and new shaving cream for each mini “rainstorm.”
FAQs
Can I use gel shaving cream for this activity?
It’s best to use foam shaving cream, not gel. The light, fluffy foam mimics cloud texture beautifully and holds the colored water just long enough for the dramatic “rainfall” effect. Gel shaving creams don’t create the same cloud-like layer and can sink or dissolve too quickly.
Is Rain Cloud in a Jar safe for kids?
Absolutely! This activity uses only water, food coloring, and shaving cream. While it’s non-toxic, remind young children not to eat or taste any parts, and wash hands after handling shaving cream just to be safe. Always supervise the experiment, especially with smaller kids.
What do I do if my cloud collapses too soon?
If the shaving cream breaks down or the color drops straight through, you may have added too much colored solution at once. For the best Rain Cloud in a Jar experience, add drops slowly and let the “rain” build up for a while before breaking through. Practice makes perfect for stormy skies!
Can I use natural food coloring?
Yes! Natural food coloring works great for this activity. Just make sure it’s concentrated enough to show up against your cloud and water—you want those vibrant raindrop streaks to really pop!
Can I make multiple jars at once for a group?
Definitely. Rain Cloud in a Jar is ideal for classrooms or parties. Set up a few jars, divide up the ingredients, and let each person or team mix their own colors for a rainbow of mini “weather systems.” It’s a hands-on activity everyone loves to try!
Final Thoughts
If you’re searching for an easy, awe-inspiring project that will delight kids, families, and curious adults, you can’t go wrong with Rain Cloud in a Jar. It’s a whirlwind of science, art, and pure joy—simple to set up, impossible to resist, and unforgettable every single time. Give it a try and let the weather magic begin!
Print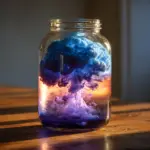
Rain Cloud in a Jar Recipe
- Prep Time: 5 minutes
- Cook Time: 0 minutes
- Total Time: 5 minutes
- Yield: 1 jar
- Category: Educational Activity
- Method: No-Cook
- Cuisine: N/A
- Diet: Vegetarian
Description
Create a mesmerizing ‘Rain Cloud in a Jar’ with this simple science experiment that demonstrates cloud formation and rainfall. Perfect for engaging kids in learning about weather!
Ingredients
Ingredients:
- 1 large clear glass jar or cup
- Water (enough to fill the jar 3/4 full)
- Shaving cream (foam type, not gel)
- Food coloring (blue or any desired color)
- Small cup or bowl for mixing
- Dropper or spoon
Instructions
- Fill the Jar: Fill the jar 3/4 full with water.
- Create the Cloud: Spray shaving cream on top of the water to form a ‘cloud.’
- Prepare Colored Water: Mix a few drops of food coloring with water in a separate cup.
- Add Color: Use a dropper or spoon to slowly drop colored water onto the shaving cream.
- Observe: Watch as the color seeps through the ‘cloud’ and rains into the water, mimicking rainfall. Add drops slowly for the best effect.
Notes
- This experiment beautifully illustrates how clouds hold moisture and release rain, making it a great educational tool for kids and classrooms.
- For optimal results, avoid oversaturating the shaving cream all at once; add color gradually.
Nutrition
- Serving Size: N/A
- Calories: 0
- Sugar: 0g
- Sodium: 0mg
- Fat: 0g
- Saturated Fat: 0g
- Unsaturated Fat: 0g
- Trans Fat: 0g
- Carbohydrates: 0g
- Fiber: 0g
- Protein: 0g
- Cholesterol: 0mg


