
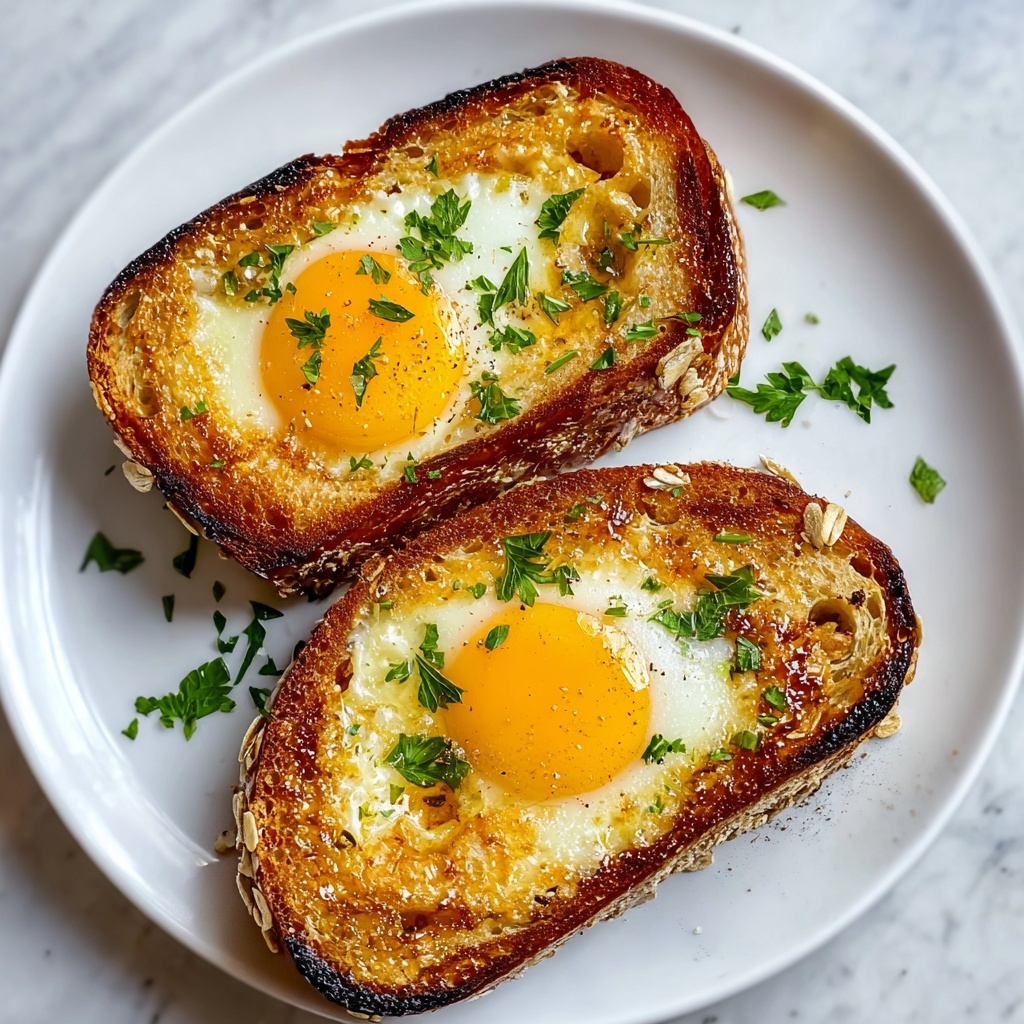
If you have been searching for a simple yet incredibly satisfying breakfast or brunch, look no further than this heartwarming Cheesy Egg Toast Recipe. It perfectly balances fluffy bread, creamy eggs, and melted cheese, creating a dish that feels both comforting and gourmet. Ready in under half an hour, it’s ideal for busy mornings or lazy weekends when you deserve something special without fuss. Every bite offers a delightful dance of textures and flavors that’s not just delicious but also easy to make—a true kitchen winner that I love sharing with friends and family.

Ingredients You’ll Need
The beauty of this recipe lies in its simplicity. Each ingredient plays a vital role, from the buttery bread that crisps to perfection to the cheese that melts into gooey goodness, all coming together to create a symphony of taste and texture.
- 4 slices bread: Choose fluffy sourdough or hearty whole grain for the perfect texture and a sturdy base.
- 2 tablespoons unsalted butter: This adds richness and helps crisp the bread just right without overpowering flavors.
- 4 large eggs: Fresher eggs yield creamier yolks that make the dish irresistibly luscious.
- Salt: Just a pinch enhances the natural flavors of your eggs and cheese.
- Freshly ground black pepper: A dash provides a gentle hint of warmth and spice to keep things interesting.
- 1 cup shredded cheddar cheese: Cheddar is classic here, but mozzarella or gouda are lovely twists if you want to experiment.
- 1 tablespoon chopped fresh chives or parsley: These add a fresh, vibrant pop of color and subtle herbal brightness.
- 1 teaspoon olive oil: A light drizzle keeps everything from sticking and deepens the overall flavor profile.
How to Make Cheesy Egg Toast Recipe
Step 1: Preheat and Prepare
Start by preheating your oven to a warm 375°F (190°C). This temperature is perfect for getting that nice golden toast while gently cooking the eggs and melting the cheese without drying anything out.
Step 2: Butter Your Bread
Spread a thin layer of unsalted butter on one side of each bread slice. This buttery touch is key to helping the bread crisp beautifully and layering in flavor that makes each bite memorable.
Step 3: Arrange and Shape Your Bread
Place the buttered side down on a baking sheet. Then, gently press down in the center of each slice to create a small indent—think of it as a cozy little nest where your egg will sit snugly without spilling over.
Step 4: Add Eggs and Season
Carefully crack one fresh egg into each indent. Take a moment to keep the yolks intact; they’re the heart of this dish and give it its rich, creamy texture when baked. Sprinkle a pinch of salt and freshly ground pepper over each egg to lift those flavors.
Step 5: Cheese It Up
Now comes the irresistible part—sprinkle shredded cheddar cheese evenly over the eggs. As it bakes, that cheese will melt to golden perfection and add a luscious, gooey layer that ties everything together.
Step 6: Bake to Perfection
Pop the baking sheet into your preheated oven and bake for 12 to 15 minutes. Timing depends on how runny you want your yolks, but either way, you’ll end up with bubbly, golden cheese and perfectly cooked eggs nestled in crispy bread.
Step 7: Finish with Fresh Herbs
Once out of the oven, let the toasts rest for a couple of minutes—this pause helps all those rich flavors meld. Top each slice with a sprinkle of fresh chopped chives or parsley for a bright, fresh finish that complements the richness.
How to Serve Cheesy Egg Toast Recipe
Garnishes
A little fresh herb sprinkle does wonders here. Chives or parsley add not only color but a subtle herbal brightness that cuts through the richness of the cheese and eggs, balancing every bite in the best possible way.
Side Dishes
While this dish shines on its own, it pairs beautifully with lightly dressed greens or a refreshing fruit salad for a well-rounded meal. Crispy bacon or sausage on the side can also elevate this to hearty brunch territory.
Creative Ways to Present
Try serving the cheesy egg toast open-faced on rustic wooden boards for a charming farmhouse vibe. You can also customize it by adding slices of avocado, hot sauce, or even a dollop of sour cream for extra richness and flair.
Make Ahead and Storage
Storing Leftovers
If you happen to have leftovers, store them in an airtight container in the refrigerator for up to two days. The toast will soften a bit but can be revived deliciously with a quick reheat in the oven or toaster oven.
Freezing
While this recipe is best fresh, you can freeze individual cheesy egg toasts wrapped tightly in plastic wrap and foil. Freeze for up to one month and thaw overnight in the fridge before reheating to keep the flavors intact.
Reheating
Reheat refrigerated or thawed toasts in a preheated oven at 350°F (175°C) for about 10 minutes or until warmed through and crispy again. Avoid microwaving to prevent sogginess and maintain that crunchy, cheesy finish you love.
FAQs
Can I use a different type of cheese for this recipe?
Absolutely! While cheddar is classic and melts beautifully, mozzarella, gouda, or even pepper jack can add unique flavors and textures. Feel free to experiment based on what you enjoy.
How do I know when the eggs are done?
Bake until the whites are fully set but yolks still have a slight wobble for creamy texture. If you prefer firmer yolks, simply leave them in the oven a few minutes longer—but keep a close eye so the toast doesn’t burn.
Is it possible to make this recipe vegan or dairy-free?
You can try vegan bread, non-dairy butter, and substitute eggs with tofu or chickpea flour mixes. For cheese, vegan shreds will work but keep in mind the texture and flavor will differ from the classic cheesy egg toast experience.
Can I add veggies to the Cheesy Egg Toast Recipe?
Definitely! Adding sautéed spinach, mushrooms, tomatoes, or even bell peppers before baking can boost both nutrition and flavor, making it a heartier breakfast or light meal.
What bread works best for this recipe?
Fluffy sourdough or hearty whole grain breads are ideal because they provide structure to hold the egg and cheese without getting soggy. Thinner or softer breads may not hold up as well during baking.
Final Thoughts
This Cheesy Egg Toast Recipe has quickly become one of my go-to dishes whenever I want something satisfying, quick, and utterly delicious. It’s a wonderful blend of simple ingredients coming together in perfect harmony. I encourage you to try it yourself—once you do, it just might become your new favorite breakfast too!
Print
Cheesy Egg Toast Recipe
- Prep Time: 10 minutes
- Cook Time: 15 minutes
- Total Time: 25 minutes
- Yield: 4 servings
- Category: Breakfast
- Method: Baking
- Cuisine: American
Description
This irresistible cheesy egg toast recipe combines fluffy sourdough or hearty whole grain bread with rich butter, fresh eggs, melted cheddar cheese, and a hint of fresh herbs. Baked to perfection in under 30 minutes, it delivers a comforting, protein-packed breakfast with a crispy, golden finish and a creamy, cheesy center.
Ingredients
Bread and Butter
- 4 slices bread (Choose fluffy sourdough or hearty whole grain for the perfect texture.)
- 2 tablespoons unsalted butter (This will give your toast a rich, buttery flavor.)
Egg and Seasoning
- 4 large eggs (Fresher eggs will yield creamier yolks and enhance the overall taste.)
- Salt (Just a pinch enhances the natural flavors of the eggs.)
- Freshly ground black pepper (A dash of pepper adds a little bit of spice!)
Cheese and Garnish
- 1 cup shredded cheddar cheese (Feel free to substitute with your favorite cheese, such as mozzarella or gouda for different flavors.)
- 1 tablespoon chopped fresh chives or parsley (Adds a pop of color and freshness to your dish.)
Other
- 1 teaspoon olive oil (A light drizzle helps prevent sticking and adds depth to the flavor.)
Instructions
- Preheat Oven: Preheat your oven to 375°F (190°C). This step ensures your cheesy egg toasts will be cooked and toasted evenly.
- Butter the Bread: Spread a thin layer of unsalted butter on one side of each bread slice. This will add richness and help achieve a crisp texture.
- Prepare Baking Sheet: Lightly drizzle or brush the baking sheet with olive oil to prevent sticking. Place the buttered side of the bread down onto the baking sheet.
- Create Indents: Gently press down the center of each bread slice to make a small well. This cavity will securely hold the egg during baking.
- Add Eggs: Carefully crack one egg into the indent of each bread slice, making sure the yolk remains intact for a beautiful presentation.
- Season Eggs: Sprinkle a pinch of salt and freshly ground black pepper over each egg to enhance the flavors.
- Add Cheese: Distribute the shredded cheddar cheese evenly over the eggs on each slice. The cheese will melt and meld with the eggs as they bake.
- Bake: Place the baking sheet in the preheated oven and bake for 12-15 minutes, or until the egg whites are set to your liking and the cheese is bubbly and golden brown.
- Cool and Garnish: Remove the toasts from the oven and let them cool for 2-3 minutes to allow flavors to meld.
- Sprinkle Herbs and Serve: Garnish with chopped fresh chives or parsley before serving for a pop of color and freshness. Serve immediately and enjoy your cheesy egg toast!
Notes
- Use fresh eggs for the creamiest yolks and best flavor.
- You can substitute cheddar cheese with mozzarella, gouda, or any melting cheese you prefer.
- Adjust baking time to achieve runnier or firmer yolks according to your taste.
- For an extra crunch, lightly toast the bread before adding butter and eggs.
- Adding a few chili flakes or hot sauce can spice up this dish if desired.


