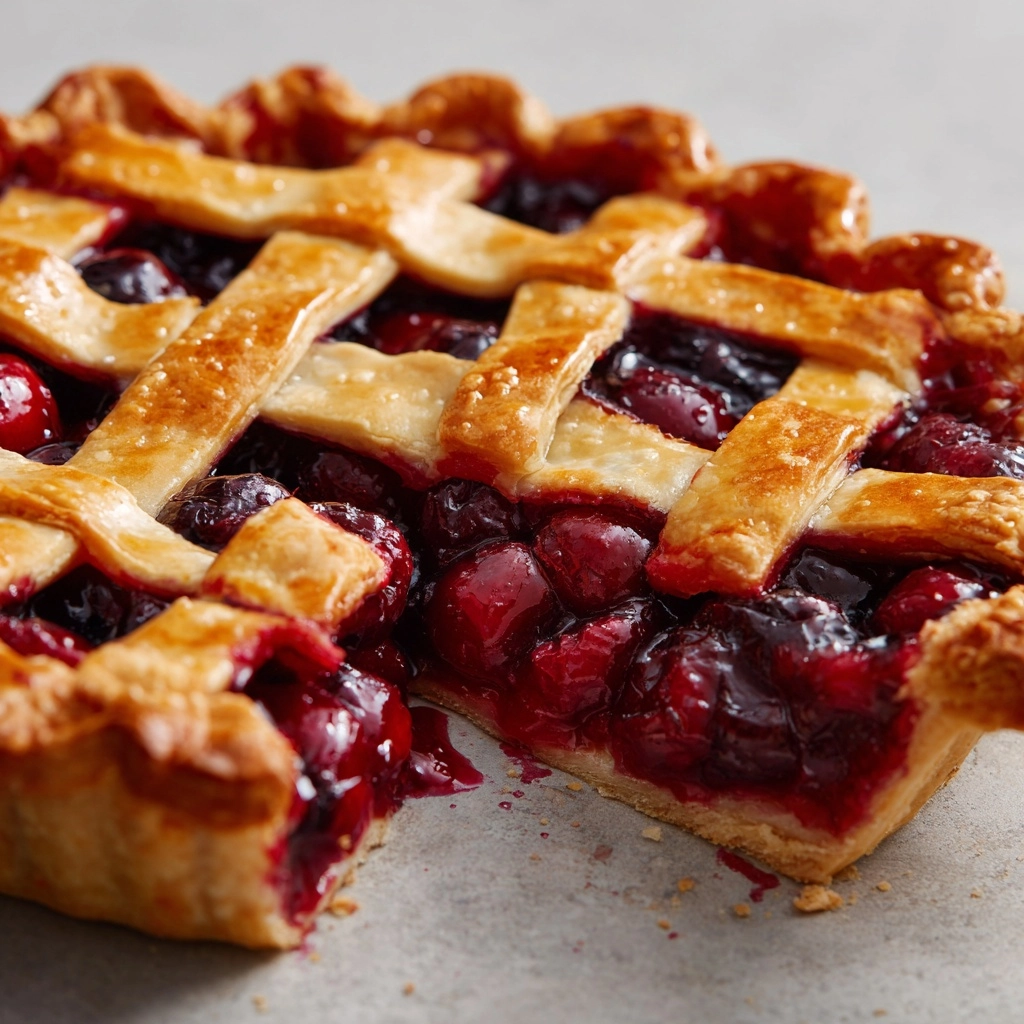
If you have been searching high and low for a truly comforting and irresistible dessert, look no further than this Homemade Cherry Pie Recipe. Bursting with vibrant tart cherries surrounded by a perfectly flaky, golden crust, this pie is a celebration of classic flavors that instantly bring warmth to any table. The balance of sweet and tangy cherries combined with a hint of almond extract makes every bite a joy. It’s one of those recipes that feels like a hug in pie form, guaranteed to delight friends, family, and even the pickiest dessert lovers.
Ingredients You’ll Need
Gathering the right ingredients is the first step to achieving that ideal mix of flavors and textures in your pie. Each ingredient plays an important role, ensuring your cherry pie isn’t just good — it’s exceptional.
- 2 (14.5-ounce) cans tart cherries in water (drained): The heart of the pie, these provide that signature bright and tart flavor with a luscious texture.
- 1 cup granulated sugar: Adds sweetness to balance the tart cherries and helps create a glossy filling.
- 1/4 cup cornstarch: Acts as the thickening agent to give your filling that perfect, sliceable consistency.
- 1/4 teaspoon almond extract: A small but mighty addition that elevates the cherry flavor with a subtle nutty aroma.
- 1 tablespoon lemon juice: Adds a fresh zing to brighten the entire filling.
- 1/8 teaspoon salt: Boosts flavor depth and balances sweetness.
- 2 tablespoons butter (cut into small pieces): Dotting the top creates a rich, glossy finish that melts into the filling.
- 1 package refrigerated pie crusts (2 crusts): Convenient and flaky, they form the beautiful golden shell for your cherries.
- 1 tablespoon milk (for brushing): Adds a lovely sheen and helps the crust brown evenly.
- 1 tablespoon coarse sugar (optional, for topping): Sprinkled on top, this gives a delightful crunch and sparkle to your pie’s crust.
How to Make Homemade Cherry Pie Recipe
Step 1: Prepare the Cherry Filling
Begin by combining the drained tart cherries, sugar, cornstarch, almond extract, lemon juice, and salt in a medium saucepan. Cook over medium heat while stirring constantly to prevent clumping until the mixture thickens and starts bubbling. This process usually takes about 5 to 7 minutes. The filling should be thick yet luscious, coating your spoon beautifully. Remove from heat and let it cool slightly while you prepare the crust.
Step 2: Roll Out the Bottom Crust
Unroll one refrigerated pie crust and carefully fit it into a 9-inch pie dish. Press gently to fit it snugly, trimming any excess dough hanging over the edges. This crust will hold all your delicious cherry filling, so making sure it’s evenly spread out helps with an even bake and an attractive look.
Step 3: Fill the Pie
Pour the slightly cooled cherry filling into the prepared crust, making sure it’s evenly distributed. Dot the filling with small pieces of butter, which will melt into the cherry mixture, adding richness and a glossy finish during baking.
Step 4: Add the Top Crust
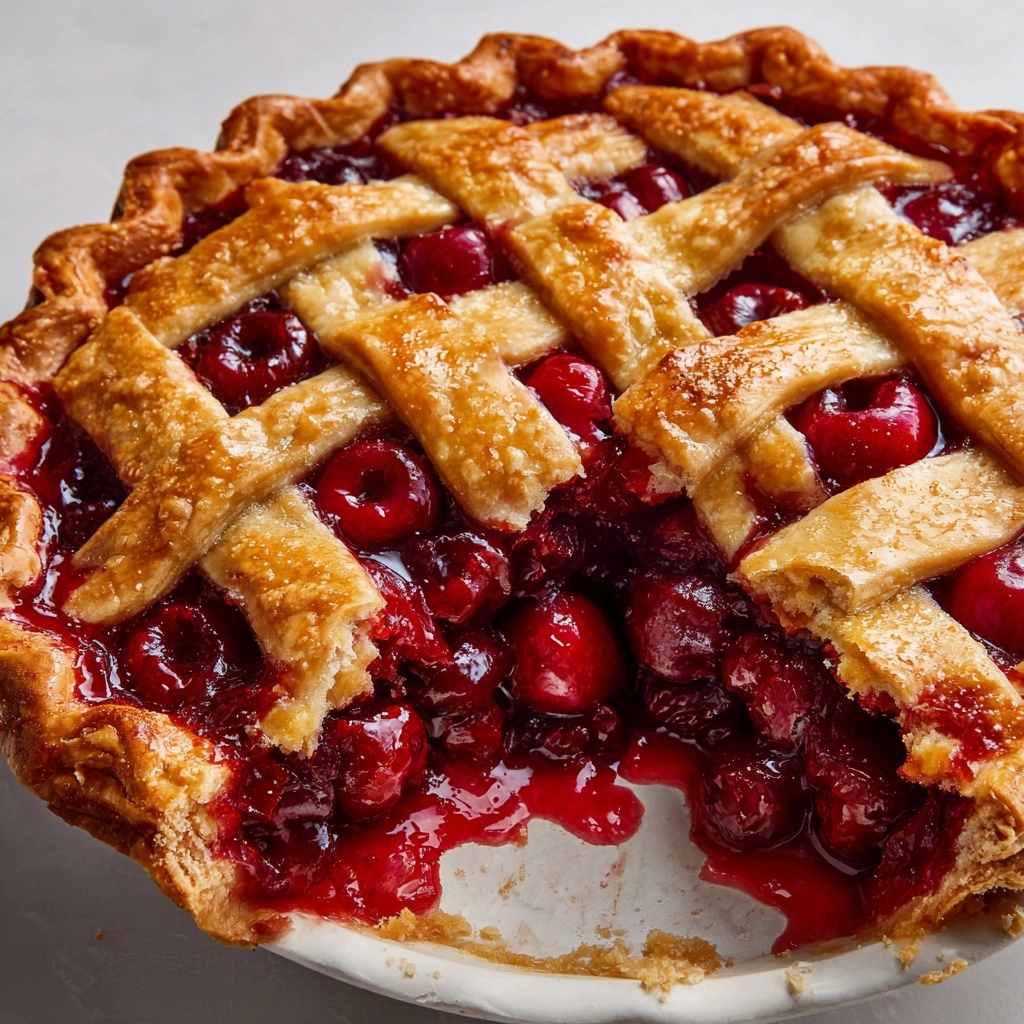
Roll out the second pie crust. You can lay it whole over the filling for a classic look or create a lattice pattern by cutting it into strips and weaving them over the pie. Seal the edges by pinching and crimping to keep the filling contained while baking.
Step 5: Finish and Bake
Brush the top crust with milk to encourage browning and sprinkle with coarse sugar for that extra sparkly crunch if you like. Place the pie on a baking sheet to catch any drips, then bake at 425°F (220°C) for 40 to 45 minutes. If the edges brown too quickly, cover them with foil partway through baking. The pie is ready when the crust is a beautiful golden brown and the cherry filling is bubbling through the vent holes or lattice.
Step 6: Cool Before Serving
Allow your pie to cool for at least 2 hours at room temperature. Cooling is important as it helps the filling to set properly, making slicing neat and serving effortless. Resist the urge to dive in immediately — good things come to those who wait!
How to Serve Homemade Cherry Pie Recipe

Garnishes
A simple dollop of whipped cream or a scoop of vanilla ice cream can transform this homemade cherry pie into a dreamy treat. Fresh mint leaves add a lovely color contrast and refreshing scent. For a rustic touch, dust a light sprinkle of powdered sugar just before serving.
Side Dishes
This pie pairs wonderfully with classic sides like coffee or a rich hot chocolate, especially on cooler days. If you prefer to keep things light, a fresh fruit salad or a simple green salad with a citrus vinaigrette provides a nice balance against the richness of the pie.
Creative Ways to Present
Serve slices on vintage floral plates for a charming tea party vibe or on sleek modern dishes for a contemporary twist. Top each slice with edible flowers or a drizzle of chocolate sauce for an elevated look. You can even scoop pie filling into mini tart shells for bite-sized delights at gatherings.
Make Ahead and Storage
Storing Leftovers
Store any leftover pie tightly covered at room temperature if you plan to eat it within a day. For longer keeping, refrigerate it for up to 4 days. Always cover the pie to protect the crust from drying out and to keep the flavors fresh.
Freezing
Freeze leftover pie by wrapping it tightly in plastic wrap and then in foil to prevent freezer burn. It can keep well in the freezer for up to 2 months. Thaw overnight in the refrigerator before reheating for best results.
Reheating
To enjoy your pie warm, reheat in a 350°F (175°C) oven for about 15 to 20 minutes. This method crisps the crust back up and warms the filling evenly. Avoid microwaving to keep the crust flaky and delicious rather than soggy.
FAQs
Can I use fresh cherries instead of canned?
Absolutely! If you have access to fresh or frozen tart cherries, you can substitute them for the canned ones. Just be sure to pit them first, and you may need to adjust the sugar content depending on how sweet or tart your cherries are.
Is it necessary to use almond extract?
While almond extract isn’t mandatory, it adds a lovely depth to the cherry flavor that really makes the pie stand out. If you prefer a pure cherry taste, you can leave it out or try a splash of vanilla extract instead.
How can I prevent the bottom crust from getting soggy?
To avoid a soggy bottom, you can blind bake the bottom crust for a few minutes before adding the filling, or make sure the filling is thick and not too watery before pouring it in. Baking the pie on a lower oven rack can also help crisp up the crust.
Can I make this pie gluten-free?
Definitely! Substitute the refrigerated pie crusts with gluten-free versions available at many stores, or make your own gluten-free crust at home. The filling remains the same and just as delicious.
How long will the pie keep fresh?
When stored properly at room temperature, your cherry pie will stay fresh for about 1 day. Refrigeration extends the life to about 4 days. Beyond that, freezing is your best bet to maintain quality.
Final Thoughts
There’s something undeniably special about making a Homemade Cherry Pie Recipe from scratch — the memories, the aroma, the distinct flavor all come together beautifully. Whether you’re baking it for a holiday, a family gathering, or just because, this recipe promises to be a standout favorite. So grab those tart cherries, roll out your crust, and get ready to enjoy a slice of joyful comfort. You won’t regret it!
Print
Homemade Cherry Pie Recipe
- Prep Time: 20 minutes
- Cook Time: 45 minutes
- Total Time: 1 hour 5 minutes
- Yield: 8 servings
- Category: Dessert
- Method: Baking
- Cuisine: American
- Diet: Vegetarian
Description
This Homemade Cherry Pie recipe delivers a classic, sweet-tart dessert perfect for any occasion. Featuring a luscious cherry filling made from tart cherries and a flaky, golden-brown crust, this pie is both easy to prepare and irresistibly delicious. With a buttery lattice or full crust top and a hint of almond extract, it’s a treat that captures the essence of summer and makes for a comforting dessert year-round.
Ingredients
Filling
- 2 (14.5-ounce) cans tart cherries in water, drained
- 1 cup granulated sugar
- 1/4 cup cornstarch
- 1/4 teaspoon almond extract
- 1 tablespoon lemon juice
- 1/8 teaspoon salt
- 2 tablespoons butter, cut into small pieces
Crust and Topping
- 1 package refrigerated pie crusts (2 crusts)
- 1 tablespoon milk (for brushing)
- 1 tablespoon coarse sugar (optional, for topping)
Instructions
- Preheat Oven: Preheat your oven to 425°F (220°C) to prepare it for baking the pie.
- Make the Cherry Filling: In a medium saucepan, combine the drained tart cherries, granulated sugar, cornstarch, almond extract, lemon juice, and salt. Cook over medium heat, stirring constantly to prevent lumps and sticking, until the mixture thickens and starts to bubble, which usually takes about 5 to 7 minutes. Once thickened, remove the pan from heat and allow the filling to cool slightly.
- Prepare Pie Crust: Roll out one of the refrigerated pie crusts and fit it carefully into a 9-inch pie dish, ensuring it covers the bottom and sides evenly.
- Fill the Pie: Pour the warm cherry filling into the prepared pie crust. Dot the top of the filling with small pieces of butter to add richness as the pie bakes.
- Add the Top Crust: Roll out the second pie crust and either place it whole over the filling or cut it into strips to create a lattice pattern. Trim any excess crust and seal the edges by crimping them together to prevent leakage during baking.
- Brush and Sugar the Top: Brush the top crust with milk to promote browning and sprinkle coarse sugar over it if you desire a sweet, crunchy topping.
- Bake the Pie: Place the pie on a baking sheet to catch any drips and bake in the preheated oven for 40 to 45 minutes or until the crust turns golden brown and the filling is bubbly. To prevent the edges from over-browning, cover them with strips of foil partway through baking if needed.
- Cool and Serve: Remove the pie from the oven and let it cool for at least 2 hours. This cooling time allows the filling to set properly for clean slices. Serve it as is or with a scoop of vanilla ice cream for a delightful finish.
Notes
- For a more natural flavor, substitute canned cherries with fresh or frozen pitted tart cherries when they are in season.
- You can prepare the pie a day in advance. Store it at room temperature or refrigerate it, then bring it to room temperature before serving for best taste.
- Serve the cherry pie with vanilla ice cream or whipped cream for an extra indulgence.

