
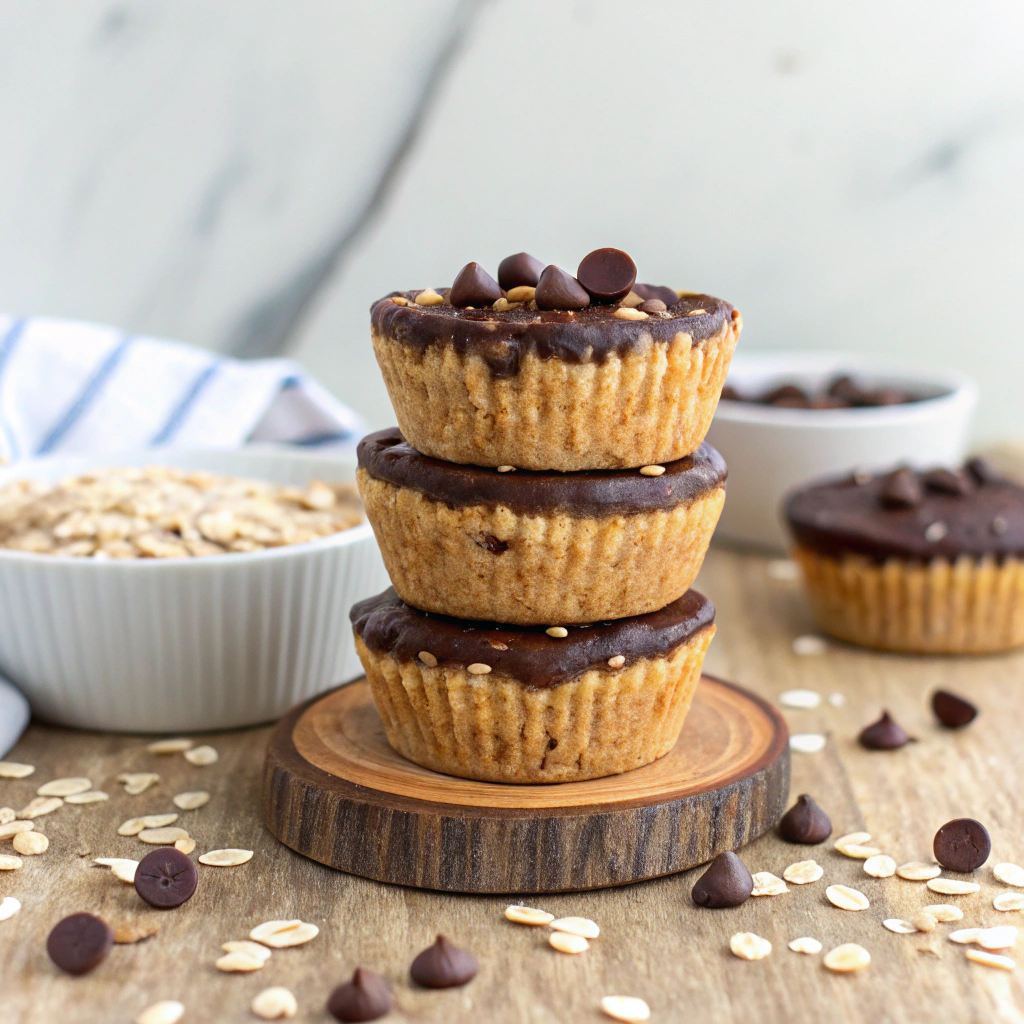
If you’re on the hunt for a delightful, easy-to-make snack that hits all the right notes, the No-Bake Peanut Butter Oat Cups – 7 Irresistible Treats You’ll Love Instantly Recipe is the one to try. This no-fuss recipe creates perfectly chewy, nutty little cups that bring together wholesome oats and creamy peanut butter in a way you’ll want to make time and again. They’re sweet enough to satisfy your cravings but packed with natural ingredients so you can feel great about indulging. Trust me, once you try these treats, they’ll quickly become your go-to snack for busy days, after workouts, or just when you want a little pick-me-up.

Ingredients You’ll Need
Gathering the right ingredients for the No-Bake Peanut Butter Oat Cups – 7 Irresistible Treats You’ll Love Instantly Recipe is wonderfully simple. Each element plays a crucial role, from the creamy texture of the peanut butter to the wholesome heartiness of the oats, creating that perfect balance of flavor and texture.
- Peanut Butter: Choose creamy or chunky based on your preference for that rich, nutty flavor that binds the cups beautifully.
- Rolled Oats: Use old-fashioned oats for the ideal chewy texture and natural sweetness.
- Honey or Maple Syrup: This acts as the natural sweetener, balancing the saltiness of the peanut butter.
- Vanilla Extract: Adds a subtle warmth and depth that enhances the overall flavor.
- Mini Chocolate Chips: For an irresistible touch of melty sweetness in every bite.
- Chia Seeds or Flaxseeds (optional): A little boost of nutrition and a slight crunch to keep things interesting.
- Sea Salt: A pinch will enhance the flavors and make that peanut butter burst pop.
How to Make No-Bake Peanut Butter Oat Cups – 7 Irresistible Treats You’ll Love Instantly Recipe
Step 1: Warm Up the Peanut Butter Mixture
Start by gently warming the peanut butter and honey in a microwave-safe bowl or on the stove over low heat. This makes it easier to stir and creates a smooth, luscious base that unites all the flavors. Don’t rush this step—it’s the secret to that lovely, creamy texture.
Step 2: Stir in Vanilla and Sea Salt
Once your peanut butter and honey are perfectly mixed, add a splash of vanilla extract and a pinch of sea salt. This little combo transforms the flavor profile from plain to absolutely gourmet, balancing sweet and savory with flair.
Step 3: Combine with Oats and Optional Seeds
Next, fold in the rolled oats, and if you’re using any, sprinkle in your chia or flaxseeds. Every spoonful will have a satisfying chew and a subtle nutty crunch, making these cups as interesting as they are tasty.
Step 4: Fold in Chocolate Chips
Now it’s time to add the mini chocolate chips. They’re the little gems that melt ever so slightly when the cups set, offering bursts of rich, chocolaty goodness in every bite. Be gentle so the chips don’t melt prematurely.
Step 5: Spoon Into Molds and Chill
Divide the mixture evenly into cupcake liners or silicone molds and press down firmly to compact the oats and peanut butter. Pop them into the fridge for about 30 minutes to an hour so they can firm up nicely into perfect little cups.
Step 6: Enjoy Immediately or Store
Once chilled, your No-Bake Peanut Butter Oat Cups – 7 Irresistible Treats You’ll Love Instantly Recipe is ready to enjoy. They keep well, too, making them great for on-the-go snacking or a quick energy boost anytime.
How to Serve No-Bake Peanut Butter Oat Cups – 7 Irresistible Treats You’ll Love Instantly Recipe
Garnishes
Bring a little extra flair by topping your cups with a drizzle of melted dark chocolate, a sprinkle of toasted coconut, or even a few crushed peanuts. These simple touches not only look beautiful but add texture and deepen the flavor complexity.
Side Dishes
Pair these oat cups with a refreshing fruit salad or a dollop of Greek yogurt topped with berries. The fresh fruit’s natural acidity balances out the richness of the peanut butter, while yogurt adds a creamy element that rounds out the snack.
Creative Ways to Present
Use colorful muffin liners or serve on a rustic wooden platter lined with parchment paper for an inviting look. You can also stack them with parchment sheets in between for easy grab-and-go portions that look as good as they taste.
Make Ahead and Storage
Storing Leftovers
Leftover oat cups keep well in an airtight container in the refrigerator for up to one week. Keeping them chilled helps maintain their chewy texture and prevents the peanut butter from becoming too soft.
Freezing
If you want to save these treats for even longer, freezing is a great option. Place the cups in a single layer on a baking sheet to freeze solid, then transfer them to a freezer-safe bag. They’ll keep frozen for up to three months and thaw quickly at room temperature.
Reheating
While these cups are designed to be enjoyed cold or at room temperature, if you prefer a softer, melty texture, microwave one for about 10-15 seconds. They warm up beautifully without losing their charm or flavor.
FAQs
Can I use crunchy peanut butter instead of creamy?
Absolutely! Crunchy peanut butter adds an extra bit of texture and enhances the nutty flavor, making the cups even more satisfying.
Are these oat cups suitable for vegans?
Yes, as long as you use a plant-based sweetener like maple syrup and ensure your peanut butter doesn’t contain honey or other animal products.
Can I substitute oats with another grain or seed?
You can experiment with rolled quinoa flakes or crushed nuts, but keep in mind the texture and binding might vary, affecting how well the cups hold together.
How long do the cups need to chill?
Chilling for at least 30 minutes is essential to let the peanut butter mixture firm up, but an hour gives the best results in terms of texture and ease of handling.
What’s the best way to prevent the chocolate chips from melting?
Mix in the chocolate chips after the peanut butter and oats have cooled slightly to avoid melting. Using mini chocolate chips also helps—they stay intact better than larger ones.
Final Thoughts
Trust me, once you give the No-Bake Peanut Butter Oat Cups – 7 Irresistible Treats You’ll Love Instantly Recipe a try, they’ll be your handy, wholesome treat for any time cravings hit. Simple ingredients, no oven required, and all the deliciousness wrapped up into perfect little cups—what could be better? Give them a go and watch your snack game elevate instantly.
Print
No-Bake Peanut Butter Oat Cups – 7 Irresistible Treats You’ll Love Instantly Recipe
- Prep Time: 10 minutes
- Cook Time: 25 minutes
- Total Time: 35 minutes
- Yield: 4 servings
- Category: Main Course
- Method: Stovetop
- Cuisine: American
Description
This flavorful shrimp and rice skillet dish combines succulent shrimp cooked perfectly atop a bed of seasoned long-grain rice simmered in flavorful broth. Enhanced with garlic, onion, paprika, and a hint of lemon juice, this one-pan meal is easy to prepare and perfect for a wholesome dinner ready in just 35 minutes.
Ingredients
Main Ingredients
- 1 lb large shrimp, peeled and deveined
- 1 tablespoon olive oil
- 1 tablespoon butter
- 1 small onion, diced
- 3 cloves garlic, minced
- 1 cup long-grain white rice
- 2 cups chicken or vegetable broth
- 1/2 teaspoon paprika
- 1/2 teaspoon salt
- 1/4 teaspoon black pepper
- 1/4 teaspoon crushed red pepper flakes (optional)
- Juice of 1/2 lemon
- 2 tablespoons chopped parsley
Instructions
- Heat the skillet: In a large skillet, heat olive oil and butter over medium heat. Add diced onion and cook for 3–4 minutes until softened and translucent, providing a flavorful base.
- Sauté garlic and rice: Stir in minced garlic and rice, cooking for 1–2 minutes. This lightly toasts the rice and releases the aroma of garlic, enhancing depth of flavor.
- Add broth and seasonings: Pour in chicken or vegetable broth. Sprinkle in paprika, salt, black pepper, and optional crushed red pepper flakes. Bring mixture to a simmer, then cover and reduce heat to low to allow the rice to cook gently.
- Simmer the rice: Let the rice cook covered for 15 minutes, giving it time to absorb the flavorful broth and become tender.
- Add the shrimp: Uncover, gently stir the rice, then nestle the peeled shrimp atop the rice. Cover again and cook for an additional 5–7 minutes until the shrimp turn pink and opaque and the liquid is fully absorbed.
- Finish and serve: Remove skillet from heat. Drizzle freshly squeezed lemon juice over the dish and sprinkle with chopped parsley for freshness before serving.
Notes
- Ensure shrimp are peeled and deveined for the best texture and taste.
- Adjust crushed red pepper flakes to your spice preference or omit for a milder dish.
- For a vegetarian version, substitute shrimp with mushrooms or plant-based protein and use vegetable broth.
- If rice sticks to the skillet, use a wooden spoon to gently loosen it after cooking.
- Leftovers can be stored in an airtight container in the refrigerator for up to 2 days.
