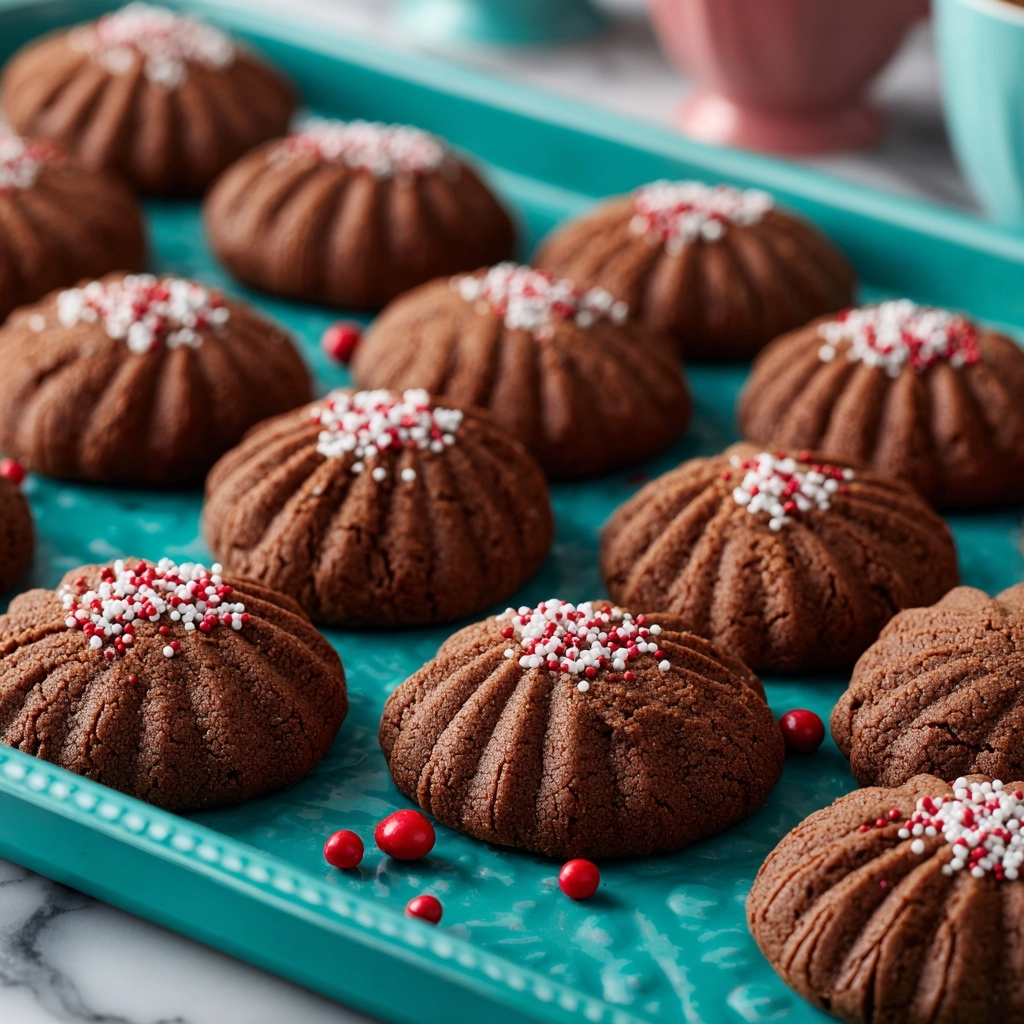
If you have a soft spot for buttery, melt-in-your-mouth treats, let me introduce you to the Piped Chocolate Butter Cookies Recipe. This delightful cookie merges the rich creaminess of butter with a deep, luscious chocolate flavor, all elegantly shaped by piping into charming swirls or lines. Whether you’re baking for a cozy afternoon tea or a festive celebration, these cookies offer a perfect bite of nostalgic sweetness with a sophisticated appearance that never fails to impress. Their tender crumb, subtle cocoa richness, and that satisfying buttery finish make every nibble a little moment of pure joy.
Ingredients You’ll Need
Gathering these simple, classic ingredients is your first step toward cookie bliss. Each one plays a vital role, ensuring your Piped Chocolate Butter Cookies have the perfect texture, taste, and chocolaty glow.
- 1 cup unsalted butter (softened): The creamy base that gives these cookies their tender, melt-in-your-mouth consistency.
- 2/3 cup powdered sugar: Provides a fine sweetness that blends smoothly to avoid graininess.
- 1 teaspoon vanilla extract: Adds warm, fragrant depth to the chocolate flavor.
- 1/4 teaspoon salt: Balances and enhances the sweetness while highlighting the cocoa.
- 1 1/4 cups all-purpose flour: The structure-builder that keeps these cookies perfectly tender yet firm enough to hold their pipe shapes.
- 1/4 cup unsweetened cocoa powder: Delivers rich chocolate intensity without overpowering.
- 1 tablespoon cornstarch: Helps create a delicate crumb and adds a lovely softness.
- 2–3 tablespoons milk (as needed): Used sparingly to adjust the dough to the perfect pipeable consistency.
- Melted chocolate or sprinkles for dipping (optional): A fun finishing touch to add extra flair and flavor.
How to Make Piped Chocolate Butter Cookies Recipe
Step 1: Prepare Your Oven and Ingredients
Start by preheating your oven to 350°F (175°C) and lining a baking sheet with parchment paper for easy cleanup and perfect cookie bottoms. Meanwhile, let your butter soften to room temperature for smooth creaming with the sugar.
Step 2: Cream Butter and Sugar
In a large mixing bowl, beat the softened butter together with powdered sugar until the mixture is light and fluffy. This step is key to ensuring your cookies have that irresistible melt-in-your-mouth quality.
Step 3: Add Vanilla and Salt
Mix in the vanilla extract and salt, which work wonders to elevate the chocolate flavor and balance the sweetness perfectly.
Step 4: Combine Dry Ingredients
Sift the flour, unsweetened cocoa powder, and cornstarch together to avoid clumps and then gradually mix into your butter mixture. The dough should be tender and almost ready to pipe.
Step 5: Adjust Dough Consistency
If the dough feels too stiff to pipe smoothly, add 1 tablespoon of milk at a time until perfect. This step ensures that the dough glides out of the piping bag with ease, creating those stunning shapes.
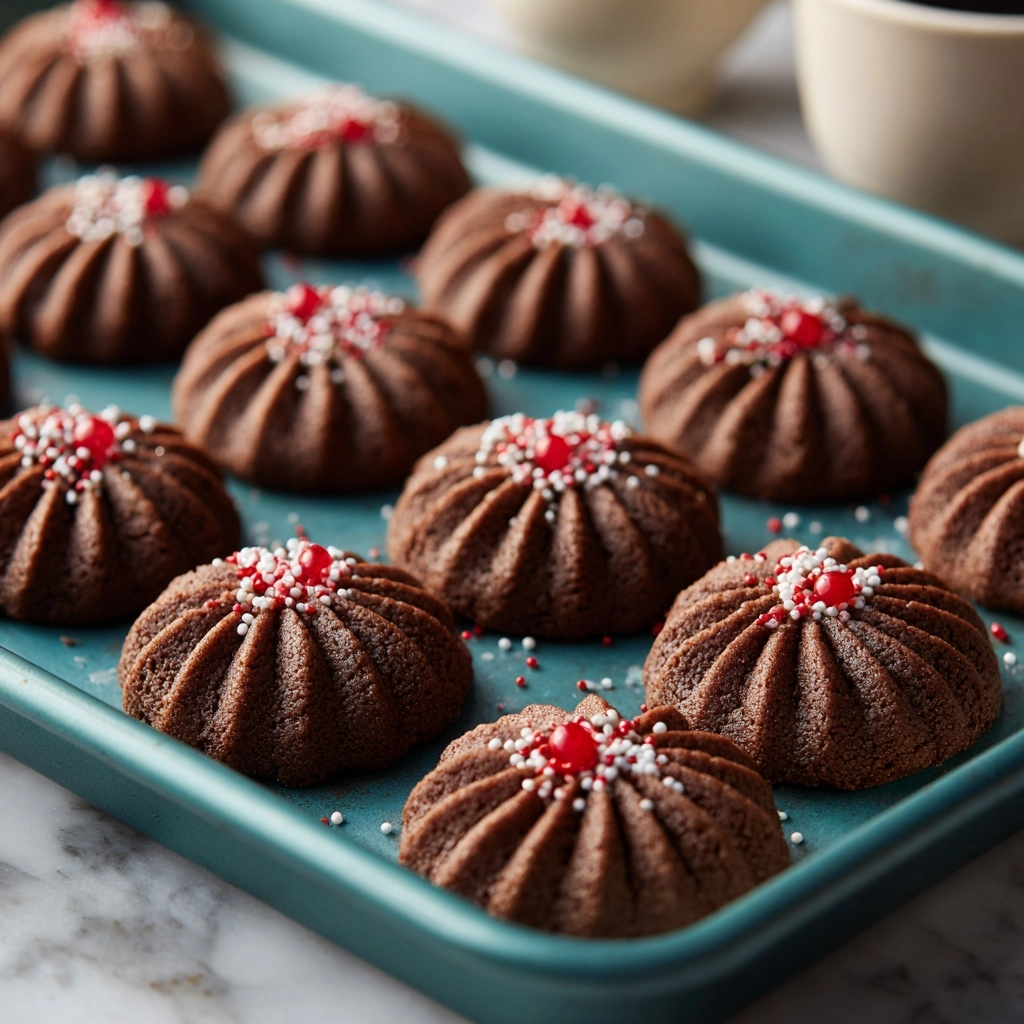
Step 6: Pipe Your Cookies
Transfer the dough into a piping bag fitted with a large open star or round tip. Now comes the fun part — pipe your cookies onto the prepared baking sheet using swirls, rosettes, or simple lines, making sure they have enough space to bake evenly.
Step 7: Bake and Cool
Bake for 10 to 12 minutes, watching for the edges to set but not brown too much. Let the cookies cool on the baking sheet for 5 minutes before transferring them to a wire rack to cool completely.
Step 8: Add Finishing Touches
Once cool, dip the cookie edges in melted chocolate or sprinkle with festive decorations if you like. This extra step takes your Piped Chocolate Butter Cookies Recipe from simple to stunning.
How to Serve Piped Chocolate Butter Cookies Recipe

Garnishes
A sprinkle of colorful sugar crystals, a drizzle of white chocolate, or a gentle dusting of cocoa powder can add charm and personality to each cookie. These little touches make your presentation pop and delight the senses before the first bite.
Side Dishes
Pair these cookies with a creamy hot chocolate, a cup of rich coffee, or a simple glass of cold milk to complement their buttery chocolate flavors. They also make a sweet side for afternoon tea or festive gatherings.
Creative Ways to Present
Arrange your piped cookies on a decorative platter layered with doilies or parchment paper, stack them with ribbons for gifts, or even serve them inside a vintage cookie jar. Such creative presentations transform these cookies into an irresistible treat worth bragging about.
Make Ahead and Storage
Storing Leftovers
Keep any leftover cookies fresh by storing them in an airtight container at room temperature. They maintain their lovely texture and flavor for up to a week, making them perfect for snacking whenever a chocolate craving hits.
Freezing
You can freeze baked cookies for longer storage. Simply place them in a single layer on a baking sheet to freeze, then transfer to a freezer-safe container or bag. When you’re ready to enjoy, thaw at room temperature gently.
Reheating
For that freshly baked warmth, reheat cookies in a low oven (around 300°F or 150°C) for a few minutes. This refreshes their softness without drying them out — perfect for cozying up with a quick sweet treat.
FAQs
Can I use salted butter instead of unsalted?
Yes, but reduce or omit the added salt in the recipe to avoid oversalting. Unsalted butter gives you full control over the final flavor balance.
What piping tip works best for this recipe?
A large open star tip or a round tip is ideal. They allow the dough to flow smoothly and create beautiful, defined shapes.
Why is cornstarch used in the dough?
Cornstarch helps soften the cookie texture, making them tender and less dense while improving their crumbly feel.
Can I make these cookies gluten-free?
To try gluten-free, substitute the all-purpose flour with a gluten-free baking blend. You may need to adjust the liquid slightly for the right dough consistency.
How long do these cookies stay fresh?
Stored in an airtight container at room temperature, they stay fresh and delicious for about a week.
Final Thoughts
If you’re searching for a sweet treat that combines simplicity with a touch of elegance, the Piped Chocolate Butter Cookies Recipe is your new best friend. Easy to whip up, full of rich buttery chocolate flavor, and endlessly customizable with decorations, these cookies are sure to bring smiles whether for a casual snack or a special occasion. Give them a try and watch how their charm wins over every heart – I promise, you’ll be making them again and again!
Print
Piped Chocolate Butter Cookies Recipe
- Prep Time: 20 minutes
- Cook Time: 12 minutes
- Total Time: 32 minutes
- Yield: 30 small cookies
- Category: Dessert
- Method: Baking
- Cuisine: European-Inspired
- Diet: Vegetarian
Description
These Piped Chocolate Butter Cookies are delicate, melt-in-your-mouth treats perfect for holiday celebrations or any time you crave a rich, cocoa-infused shortbread. Piped into elegant shapes and optionally dipped in melted chocolate or decorated with sprinkles, they combine buttery richness with a hint of vanilla and cocoa for a truly irresistible dessert.
Ingredients
Cookie Dough
- 1 cup unsalted butter (softened)
- 2/3 cup powdered sugar
- 1 teaspoon vanilla extract
- 1/4 teaspoon salt
- 1 1/4 cups all-purpose flour
- 1/4 cup unsweetened cocoa powder
- 1 tablespoon cornstarch
- 2–3 tablespoons milk (as needed)
Optional Decoration
- Melted chocolate for dipping
- Sprinkles
Instructions
- Preheat Oven and Prepare Baking Sheet: Preheat your oven to 350°F (175°C) and line a baking sheet with parchment paper to prevent sticking and ensure even baking.
- Beat Butter and Sugar: In a large mixing bowl, beat the softened unsalted butter and powdered sugar together until the mixture is light and fluffy. This step is essential for incorporating air, making the cookies tender.
- Add Flavorings: Add in the vanilla extract and salt to the butter-sugar mixture, then mix until well combined, ensuring the flavor is evenly distributed.
- Incorporate Dry Ingredients: Sift together the all-purpose flour, unsweetened cocoa powder, and cornstarch. Gradually add these dry ingredients to the wet mixture, mixing until just combined. The dough should be soft but hold its shape.
- Adjust Dough Consistency: If the dough is too stiff to pipe, add milk one tablespoon at a time until it reaches a pipeable consistency. This allows for easy shaping of the cookies.
- Pipe the Cookies: Transfer the dough into a piping bag fitted with a large open star or round tip. Pipe your desired shapes, like rosettes or lines, onto the prepared baking sheet, leaving a slight space between each cookie for expansion.
- Bake: Place the baking sheet in the oven and bake for 10–12 minutes, or until the edges of the cookies are set but the centers are still soft.
- Cool: Let the cookies cool on the baking sheet for about 5 minutes to firm up, then transfer them to a wire rack to cool completely.
- Decorate (Optional): Once fully cooled, dip the cookies into melted chocolate or decorate with sprinkles to add an extra festive touch and delicious flavor contrast.
Notes
- If the dough is too thick to pipe, allow it to sit at room temperature for a few minutes or add a little more milk, one teaspoon at a time, to reach the right consistency.
- Store these cookies in an airtight container at room temperature for up to one week to maintain freshness.
- Using parchment paper on the baking sheet is crucial to prevent sticking and ensure easy removal.
- For best results, use softened butter at room temperature but not melted to achieve the proper texture.


