
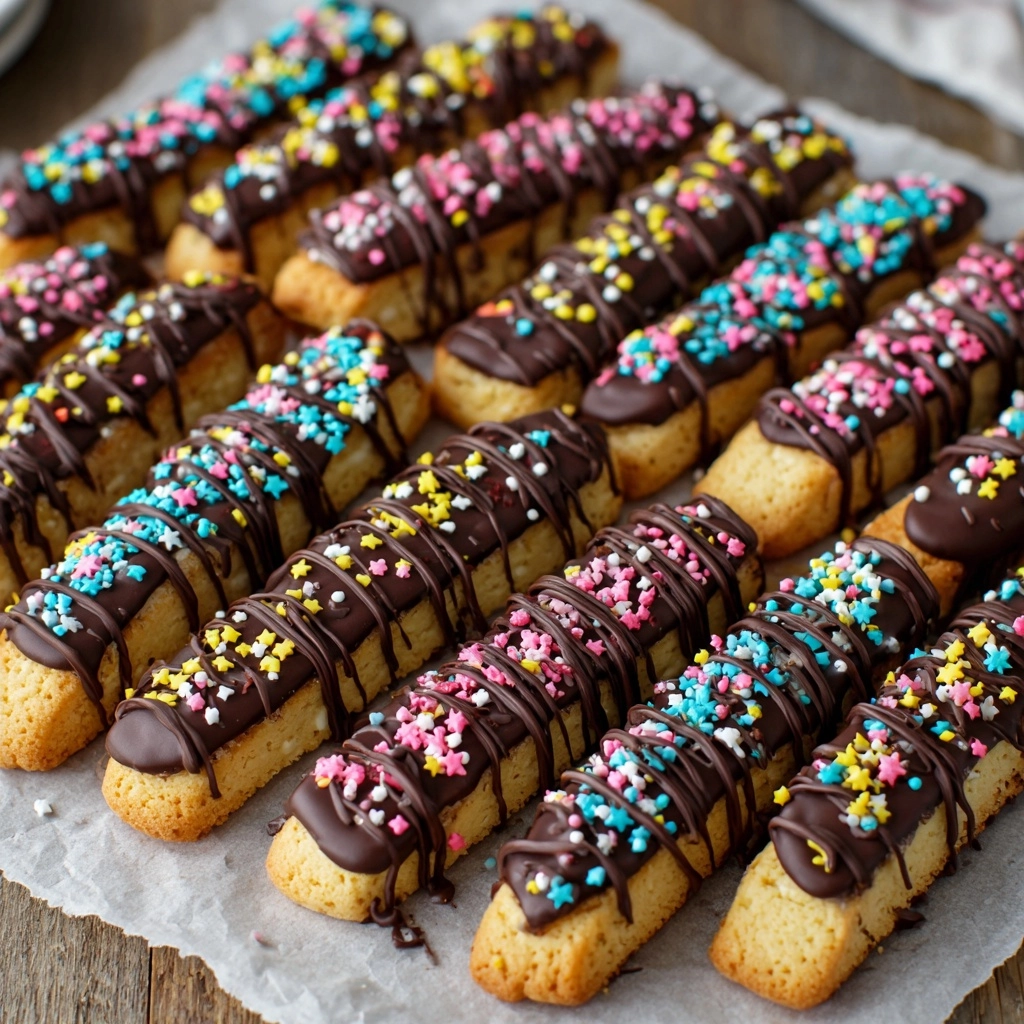
There’s something positively magical about turning a favorite snack into a festive, edible masterpiece, and that’s exactly what happens with Pocky Christmas Trees. Imagine crispy chocolate Pocky transformed with swirls of green chocolate and a flurry of sprinkles into the sweetest little Christmas trees – they’re as delightful to look at as they are to eat. These no-bake treats are perfect for cozy afternoons with kids, impressing friends at a holiday party, or making merry gifts. With just a handful of ingredients, you’ll be creating edible memories in under half an hour, and trust me, everyone’s eyes will light up when they spot these cheerful Pocky Christmas Trees on the dessert table!
Ingredients You’ll Need
-
Pocky Christmas Trees:
- 1 box of chocolate Pocky sticks
- 1 cup white chocolate chips or candy melts (green if available)
- green gel food coloring (if using white chocolate)
- assorted sprinkles or edible stars
- red and white candy pearls
- small candy canes or mini pretzel sticks (optional, for trunks)
- parchment paper
How to Make Pocky Christmas Trees
Step 1: Prepare Your Workspace
Start by lining a baking sheet with parchment paper and setting up your decorating station with plenty of space. This simple move ensures your Pocky Christmas Trees won’t stick and lets you focus on the fun part: decorating. Arrange your sprinkles, edible pearls, and any special toppings in small bowls for easy access.
Step 2: Melt and Tint the Chocolate
If you’re using white chocolate chips, place them in a microwave-safe bowl. Microwave in 30-second bursts, stirring between each interval, until completely smooth. For that classic evergreen hue, blend in a little green gel food coloring. If you found green candy melts, you’re already ahead of the game!
Step 3: Create the Christmas Tree Shape
Now for the fun! Using a spoon or a piping bag (or even a zip-top bag with a tiny snip at the corner), drizzle or pipe the melted green chocolate over the top half of each Pocky stick, zig-zagging to form the tree. Make your “branches” wider at the base and taper them as you work up, mimicking a real tree’s silhouette.
Step 4: Decorate Your Trees
While the chocolate is still soft, go wild with decorations! Sprinkle edible stars, pearls, and colorful sprinkles over each tree. This is where little hands (and imaginations) love to help. If you’d like to add trunks, gently insert a mini pretzel stick or the curved end of a mini candy cane at the bottom of each tree before everything sets.
Step 5: Set and Serve
Lay your creations on the parchment-lined baking sheet and pop them into the fridge for 15 to 20 minutes. Once the chocolate is firm, carefully peel each Pocky Christmas Tree from the paper. They’re ready to display, serve, or package as adorable edible gifts!
How to Serve Pocky Christmas Trees

Garnishes
Dress up your Pocky Christmas Trees with a little extra flair, like a sprinkle of powdered sugar for a snowy finish or a touch of edible glitter for extra sparkle. A tiny dab of white chocolate at the tree’s top lets you “glue” on a star-shaped candy, making your edible forest shine bright!
Side Dishes
Pair these festive trees with a mug of rich hot cocoa, a platter of fresh berries, or bowls of peppermint ice cream. Their sweet crunch offers a lovely contrast to creamy desserts and makes them the perfect playful addition to a holiday cookie tray.
Creative Ways to Present
Try arranging your Pocky Christmas Trees upright in a mason jar filled with sugar for a sparkling “snowy” landscape, or nestle them among pine branches on a platter for a woodland theme. For gifting, slip each one into a clear cello bag and tie with a ribbon – they’re guaranteed to charm everyone on your list!
Make Ahead and Storage
Storing Leftovers
Keep any leftover Pocky Christmas Trees in a cool, dry place, ideally in an airtight container lined with parchment. This preserves their crunch and keeps the decorations looking festive for up to one week – perfect for prepping ahead of a busy holiday schedule.
Freezing
While you can freeze Pocky Christmas Trees, it’s best to avoid it if possible. Freezing can cause the chocolate to develop a white coating (called “bloom”) and sometimes softens the Pocky stick as it thaws. If you do freeze them, pack gently with parchment between each layer, and thaw at room temperature for best results.
Reheating
No reheating needed here! These cheerful treats are best served chilled or at room temperature. If they’re straight from the fridge, give them a minute or two to lose the chill. The chocolate should be set but not rock-hard – just right for snacking!
FAQs
Can I use other flavored Pocky for these trees?
Absolutely! While classic chocolate Pocky offers a rich base, strawberry, matcha, or cookies and cream Pocky each add a playful twist. Mix and match colors for a whole forest of festive fun.
Do I need to temper the chocolate?
No need to temper here – using candy melts or regular baking chocolate chips is quick and easy, especially since these treats are stored in a cool place or the fridge. The piped chocolate will set nicely without any fuss.
How do I get a precise tree shape?
A piping bag (or a zip-top bag with a small corner snipped off) will give you the most control. Steady hands and practicing on parchment first can help too, but don’t worry if your trees are a little “rustic.” Every tree in the forest is unique!
Can kids help with decorating?
Definitely! Decorating Pocky Christmas Trees is not only simple but genuinely fun for all ages. Set out bowls of sprinkles and let imaginations run wild – it’s an easy, joyful way to make holiday memories together.
Are Pocky Christmas Trees suitable for gifting?
They make the sweetest homemade gifts! Simply package them in clear treat bags, tie with festive ribbon, and add a personalized tag. They travel well and look absolutely adorable arranged in a gift box.
Final Thoughts
If you’re seeking a dessert that combines playful creativity and irresistible flavor, you have to give these Pocky Christmas Trees a try. They capture the holiday spirit in every bite, and making them is just as much fun as eating them. Gather your favorite sprinkles, invite a friend or two, and let the festive snack-making begin!
Print
Pocky Christmas Trees Recipe
- Prep Time: 20 minutes
- Cook Time: 0 minutes
- Total Time: 20 minutes
- Yield: 10–12 Christmas trees
- Category: Dessert
- Method: No-Cook
- Cuisine: Japanese-Inspired, Holiday
- Diet: Vegetarian
Description
Learn how to make adorable Pocky Christmas Trees that are perfect for festive snacking or gifting. These cute edible holiday crafts are easy to create and fun for both kids and adults.
Ingredients
Pocky Christmas Trees:
- 1 box of chocolate Pocky sticks
- 1 cup white chocolate chips or candy melts (green if available)
- green gel food coloring (if using white chocolate)
- assorted sprinkles or edible stars
- red and white candy pearls
- small candy canes or mini pretzel sticks (optional, for trunks)
- parchment paper
Instructions
- Prepare the Trees: Line a baking sheet with parchment paper. Melt white chocolate, tint with green coloring if desired. Drizzle or pipe green chocolate over Pocky sticks in Christmas tree shapes.
- Decorate: Add sprinkles, stars, or pearls to the trees. Optionally, insert candy canes or pretzels as trunks.
- Set: Refrigerate trees until chocolate is firm, then carefully remove from parchment paper.
- Serve: Enjoy your festive Pocky Christmas Trees!
Notes
- Use a piping bag for precise decorations.
- Kids will have a blast decorating these trees!
- Store in a cool, dry place for up to one week.
Nutrition
- Serving Size: 1 tree
- Calories: 120
- Sugar: 10 g
- Sodium: 40 mg
- Fat: 6 g
- Saturated Fat: 3.5 g
- Unsaturated Fat: 2 g
- Trans Fat: 0 g
- Carbohydrates: 15 g
- Fiber: 0 g
- Protein: 1 g
- Cholesterol: 2 mg

