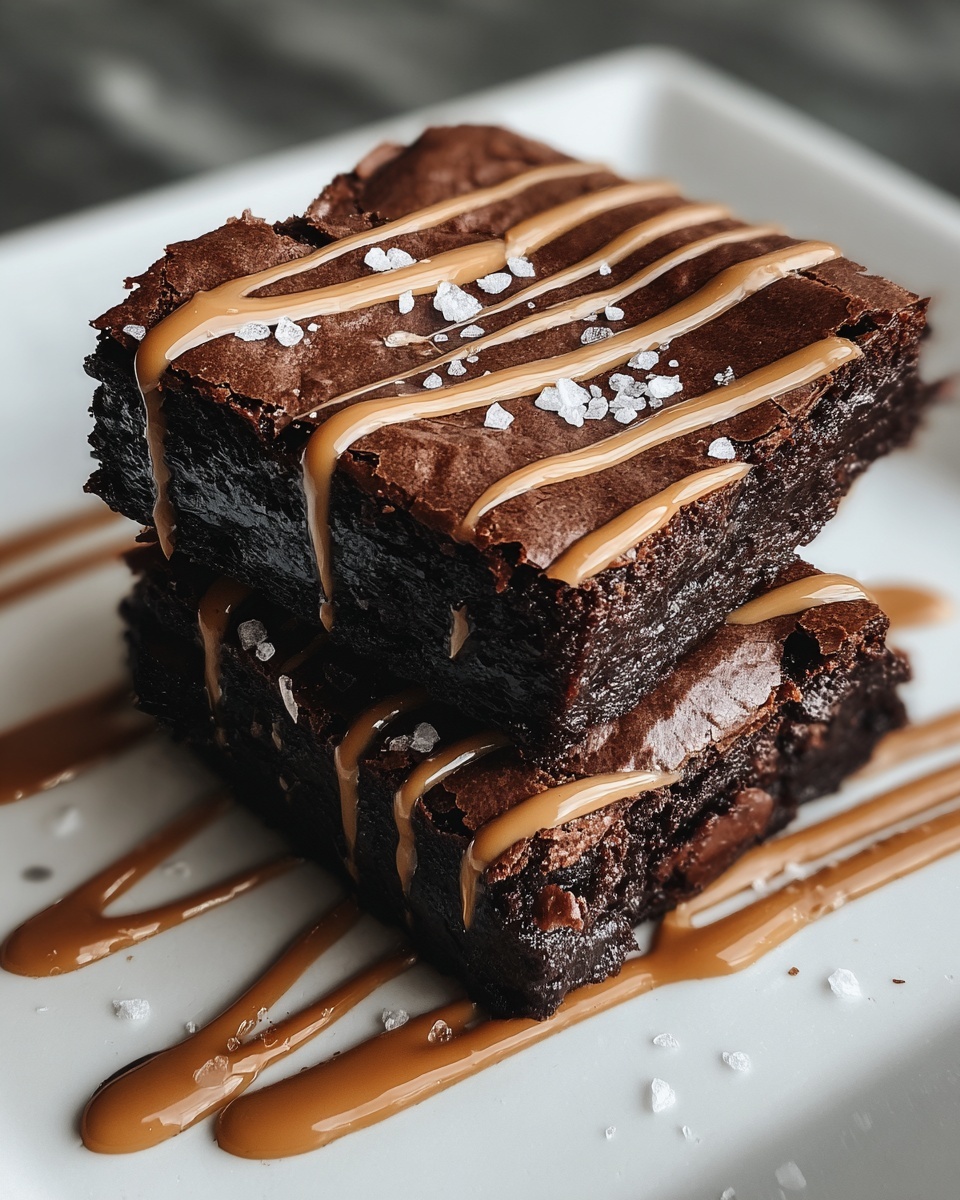
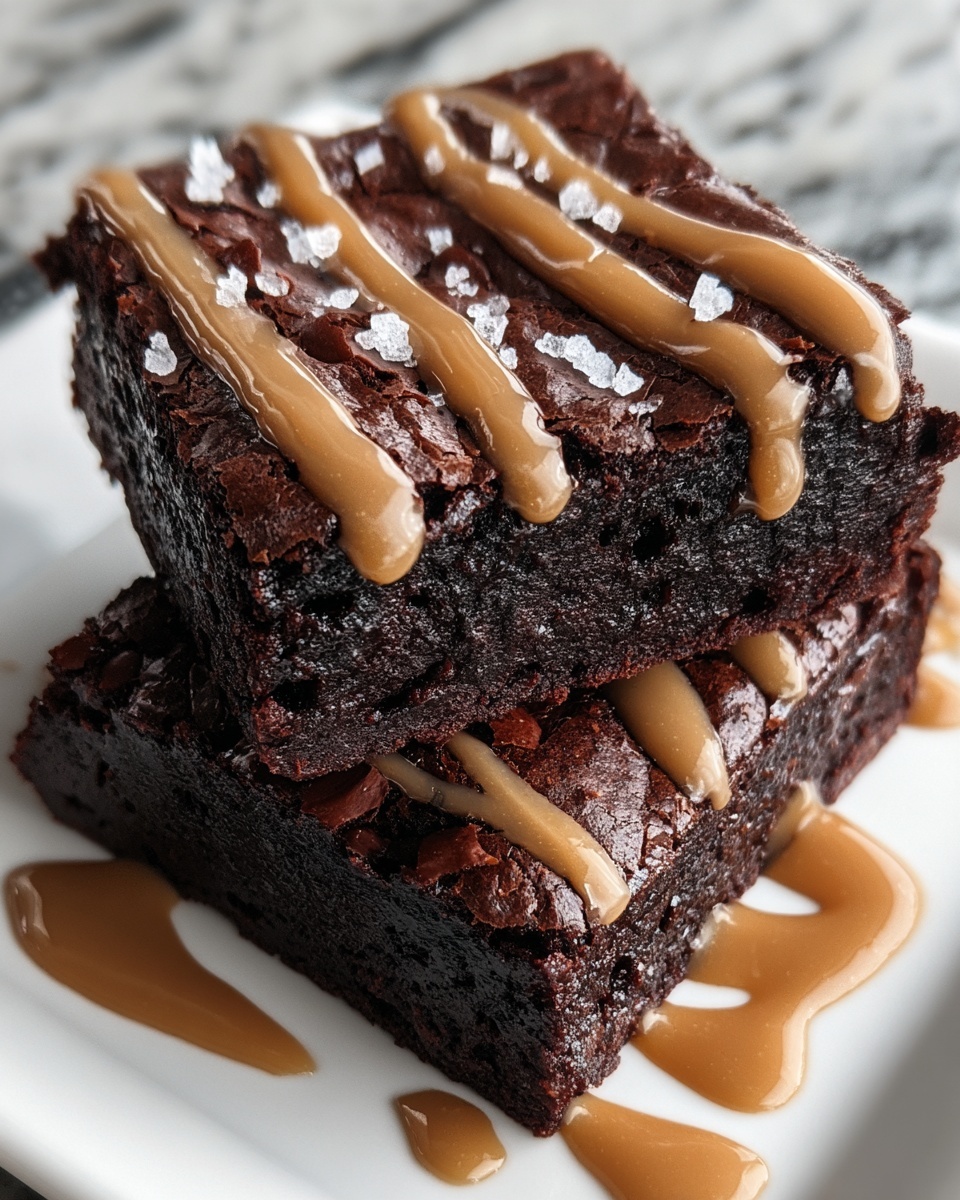
Imagine sinking your spoon into a warm, fudgy treat that’s packed with protein and completely gluten free. The Two Minute Protein Brownie (Gluten Free, Single-Serve) Recipe is exactly that—a quick, delicious indulgence perfect for those moments when you want something sweet but also nourishing, without spending ages in the kitchen. This recipe is a game-changer for busy days, workout recovery, or just whenever that chocolate craving hits hard. It’s simple, single-serve, and delivers all the rich brownie goodness with an extra protein boost, all while keeping things gluten free.
Ingredients You’ll Need
Ingredients You’ll Need
These ingredients are incredibly straightforward, yet each one plays a crucial role in crafting this brownie’s amazing flavor, texture, and nutritional profile. From the chocolatey depth of cocoa to the gentle lift from baking powder, every component matters.
- 2 tablespoons protein powder (chocolate or vanilla): Adds muscle-friendly protein and infuses the brownie with flavor and structure.
- 1 tablespoon cocoa powder: Brings rich, deep chocolate notes for that classic brownie taste.
- 1/4 teaspoon baking powder: Gives just enough lift so the brownie is moist but not dense.
- 1 tablespoon sweetener of choice: Sweetens the mix naturally; coconut sugar, erythritol, or maple syrup all work beautifully.
- 2 tablespoons milk of choice (dairy or plant-based): Makes the batter smooth and helps it come together perfectly.
- 1/4 teaspoon vanilla extract: Enhances all the chocolate flavors with a warm, inviting aroma.
- 1/2 tablespoon peanut butter or almond butter (optional): Adds luscious creaminess and a nutty hint that pairs wonderfully with chocolate.
- Pinch of salt: Balances the sweetness and intensifies the chocolate’s richness.
How to Make Two Minute Protein Brownie (Gluten Free, Single-Serve) Recipe
Step 1: Mix the Dry Ingredients
Start by gathering a microwave-safe mug or a small bowl. Combine the protein powder, cocoa powder, baking powder, your chosen sweetener, and the pinch of salt. Mixing these first ensures the leavening and cocoa are evenly distributed, giving your brownie a consistent taste and texture.
Step 2: Add the Wet Ingredients
Pour in the milk and vanilla extract to the dry mix. Stir everything thoroughly until the batter is silky smooth without lumps. If you love a bit of extra richness, gently swirl in the peanut butter or almond butter—this will create pockets of creamy nutty goodness throughout the brownie.
Step 3: Microwave to Perfection
Place your mug in the microwave and cook on high for 40 to 60 seconds. Keep a close eye here—the brownie should look set on top but still have a slightly gooey center, just like a classic molten brownie. Overcooking can dry it out, so a little gooeyness is exactly right.
Step 4: Cool and Enjoy
Let the brownie rest for about a minute to cool down slightly. This pause allows the texture to settle into the perfect fudgy consistency. You can dig in straight from the mug for convenience or transfer it onto a plate if you want a more formal presentation.
How to Serve Two Minute Protein Brownie (Gluten Free, Single-Serve) Recipe
Garnishes
Top your protein brownie with a dollop of Greek yogurt or a scoop of vanilla ice cream to add a creamy contrast to the fudgy texture. A sprinkle of crushed nuts or a drizzle of melted chocolate syrup can elevate this simple treat into something truly special.
Side Dishes
This brownie pairs beautifully with fresh berries or a handful of sliced bananas. The natural sweetness and tartness of fruits complement the richness of the chocolate, making your snack feel indulgent yet balanced.
Creative Ways to Present
For a fun twist, try layering the batter in a clear glass and chilling briefly to create a protein brownie parfait with layers of whipped cream or Greek yogurt and fresh fruit. You can also dust the top lightly with edible gold dust or cocoa to impress guests or treat yourself to something a little elegant.
Make Ahead and Storage
Storing Leftovers
If you happen to make an extra batch (though it’s hard to resist eating it right away), store your protein brownie in an airtight container in the refrigerator for up to two days. The texture may firm up, but warming it slightly before eating brings back its fudgy goodness.
Freezing
Freezing the brownie isn’t ideal for texture but can be done if needed. Wrap it tightly in plastic wrap and place it in a freezer-safe container. Thaw it in the fridge overnight, then microwave for a few seconds to revive its soft, gooey charm.
Reheating
To reheat, pop the brownie back in the microwave for about 15–20 seconds. This quick warm-up is enough to soften it and bring out the luscious chocolate aroma without drying it out.
FAQs
Can I use any type of protein powder for this recipe?
Absolutely! Chocolate or vanilla protein powder works best for flavor, but feel free to experiment with your favorites. Just keep in mind that some plant-based powders might alter the texture slightly.
Is this recipe suitable for those with nut allergies?
Yes, simply skip the peanut or almond butter, or substitute with sunflower seed butter if you want that nutty note safely. The brownie will still taste fantastic without it.
Can I make this recipe vegan?
Definitely! Use a plant-based protein powder and milk alternative like almond, oat, or soy milk. Opt for maple syrup or another vegan sweetener to keep it completely vegan-friendly.
How sweet is the brownie? Can I adjust the sweetness?
The sweetness is moderate and customizable. Feel free to adjust the amount or type of sweetener to suit your personal taste preferences, whether you want it a bit sweeter or less so.
What can I do if my brownie turns out dry?
If your brownie feels dry, try reducing the microwave time by a few seconds next time or add a splash more milk to the batter. Microwaves vary, so a little experimentation can help perfect your ideal texture.
Final Thoughts
If you’re craving a fast, satisfying, and healthy dessert that won’t derail your nutrition goals, you absolutely need to try the Two Minute Protein Brownie (Gluten Free, Single-Serve) Recipe. It’s the perfect little treat to whip up any time, delivering all the chocolate comfort you want with the added bonus of protein. Trust me, this recipe is going to become your go-to indulgence when life calls for something sweet and speedy.
Print
Two Minute Protein Brownie (Gluten Free, Single-Serve) Recipe
- Prep Time: 2 minutes
- Cook Time: 1 minute
- Total Time: 3 minutes
- Yield: 1 serving
- Category: Dessert
- Method: Microwaving
- Cuisine: American
- Diet: Gluten Free
Description
A quick and easy single-serve two-minute protein brownie that’s gluten-free and perfect for a healthy snack or dessert. Made with protein powder and cocoa, this microwave mug brownie combines convenience with nutrition, offering a warm, chocolatey treat in under three minutes.
Ingredients
Dry Ingredients
- 2 tablespoons protein powder (chocolate or vanilla)
- 1 tablespoon cocoa powder
- 1/4 teaspoon baking powder
- 1 tablespoon sweetener of choice (coconut sugar, erythritol, or maple syrup)
- Pinch of salt
Wet Ingredients
- 2 tablespoons milk of choice (dairy or plant-based)
- 1/4 teaspoon vanilla extract
- 1/2 tablespoon peanut butter or almond butter (optional)
Instructions
- Mix Dry Ingredients: In a microwave-safe mug or small bowl, combine the protein powder, cocoa powder, baking powder, sweetener, and salt. Stir thoroughly to ensure all dry ingredients are evenly distributed.
- Add Wet Ingredients: Pour in the milk and vanilla extract, stirring continuously until the batter is smooth and free of lumps. If desired, gently swirl in the peanut or almond butter to add richness and flavor.
- Microwave Cooking: Place the mug in the microwave and cook on high power for 40 to 60 seconds. Watch closely to ensure the brownie sets on top while the center remains slightly gooey for optimal texture.
- Cool and Serve: Allow the brownie to cool for about one minute before enjoying it directly from the mug or transferring it carefully to a plate for serving.
Notes
- Use a microwave-safe mug to prevent any damage or accidents.
- Adjust cooking time based on your microwave’s wattage to avoid overcooking.
- Protein powder flavor choice (chocolate or vanilla) slightly affects the final taste.
- Optional nut butter adds healthy fats and creaminess.
- Sweetener can be adjusted to taste or dietary preference.


